Birthday Bling and Sequins!

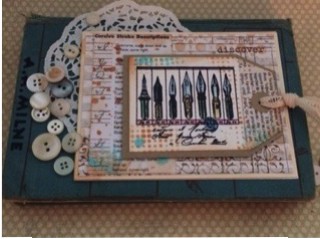
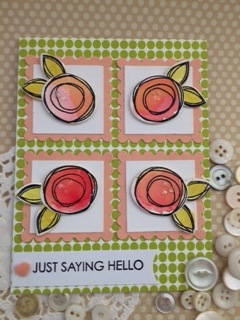
Creating special birthday cards can sometimes be challenging, especially for my two daughters who have BDays in September. I always want to up my game!  I played around with my new Fuse heat tool and after a few attempts I created a small pocket for sequins and glittery stars.  I used a few new stencils and distress inks from Ranger to create the background. I just got a new set at the Great American Stamp store in Westport, CT from Hero Arts that included a die cut and coordinating stamps.  I filled the clear pocket and tucked it under the word banner to hide the glue tape that I used to secure the filled pocket.  A bit of shiny twine completed the look.  I created a second one using some different colors.  I need a bit more practice, so time to create a few more BDay cards for upcoming birthdays!

A Fuse created pocket with sequins adds some bling!

Ticket Back to School!

I like to send a Welcome Back to School card to my teacher friends- including my retired educator friends. I wanted to create a card that incorporated many new techniques that I have been trying out.  I discovered this fountain pen nib stamp and think it was a limited edition from some company. I printed out a Palmer cursive handwriting method back ground paper and incorporated a page from an old banking check register as well.  I painted the pen nibs and added glossy accents to the ticket.  I used a Ranger stencil for inked accents and colored some texture paste with distress ink and used a smaller stencil.  A piece of dictionary page was added to the end of the tag and a piece of fabric ribbon accent was knotted to the tag.  They are in the mail to my teacher friends!  I love the way the card came out.  My multi media project for #SST weekly challenge!

A multi media ticket back to school!

A Foursome of Circle Flowers!

The weekly sketch challenge for My Favorite Things is a four square layout.  I love the squiggle flowers and die cut from Simon Says Stamp and found that  each flower fits in  small square and scalloped square.  I stamped each flower on watercolor paper and painted each flower and leaves with Ranger distress inks. I added a word banner, tiny heart and glitter glue to each flower.  Ready to mail to a friend!

Water colored flowers and a word banner

Mini-calendar on a Folded Easel Stand

I love the mini calendars that I shared as holiday gifts and have gotten rave reviews.  I also sold them at the craft sale I did before the holidays. It is a handy calendar to have in the home office.  Have to start thinking about making a new set for the 2016 year.  This was a new design that I created from a Pinterest sample I found.

Simple but purposeful easel stand from folded paper.

Double Stenciled Background with Twine Accents

Lately I have been trying different techniques to create backgrounds.  I watched a video by Jennifer Mcguire that I found on Pinterest.  The background is created with a stencil and white pigment ink, dried and then shifted to create a shadow or accent.  The stencil is inked again with a dye ink.  I added a word circle, looped twine and either some sequins or a tiny heart.  Pretty clever. I might need to buy some larger stencils to keep experimenting.

Pigment white ink and blue dye ink for a background
Pigment ink and then dye inks were used for the background

Inked Background and a Colored Flower

The background for the cards was created using alcohol inks in yellow or purple. I inked the stamp pad on the craft map and sprayed alcohol into the mat to create a puddle.  I cut a A2 sized piece of speciality paper and touch it to the inky puddle.  I let it dry and then inked the Magenta flower stamp to the paper.  I added a stamped script stamp in a few random stops.  I used Ranger texture paste to add accents using a circle stencil.  A word sentiment tag was added and an accent border stamp to the bottom. I love the yellow and purple colors. The yellow card was posted to the Monday challenge for Simon says stamp. #sswc

Texture paste using a stencil
Inked background and a inked flower

Perfect Pearls for a Perfect Accent

This is a new technique I tried after watching a video by Jennifer McGuire.  Masking off a section and blending distress inks.  The next step is to brush on silver or gold perfect pearls powder.  The shiny powder sticks to the wet ink.  I selected an embossing folder and embossed the decorated paper.  I layered this piece onto orange paper and then onto the folded card.  A black die cut hello and a few accent sequins finish the CAS look.

Distress inks and perfect pearls accent