AECP Assignment All About Layering 1 Gallery 17

Each lesson was inspirational to learn about techniques that use stamps that were layering sets.  I watched all of the video tutorials and sometimes watched them  again.  I found as a beginner layering stamper,  using the pencil guidelines very helpful.  This helped me practice and practice again.  I also checked out the homework posts from other stampers which was also very helpful as well. I was inspired  by the posts.

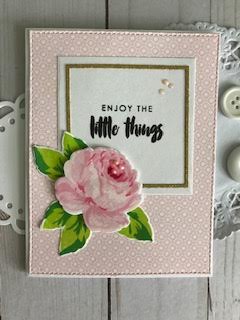
I also found using the MISTI stamping platform very helpful when I was stamping multiple layered flowers and leaves.  I watched an Altenew post on Instagram that reviewed the same helpful techniques.  I used both ideas  to practice layering and then select the stamped images  that were the best, die cut those and  used them in my card.  I ordered a set of the gradient shades of pink mini ink pads.  This was extremely helpful when stamping all of the layers of  the antique roses  and leaves.  The rich shades of color was great. I found that numbering each mini cube very helpful and was a great guide and that helped to select the right color of ink for each layered stamp of the rose.   I used some green ink for the leaves that I had in my ink supplies and that worked well.

I also learned about layouts,  design elements and how to add those little details that make a difference.    These helpful tips helped me to create a well balanced card and includes visual interest. and a focus area.  I used the element of three for the roses and leaf clusters.  I added a layered die cut square from  gold glitter paper, a stenciled gradient dot stencil from Altenew, a stamped word sentiment from Altenew  and a few Nuvo drops for visual interest.

I feel more confident about using layering stamps, but still a work in progress.  So glad I found a helpful teaching  tool to learn new techniques and refer to again and again.

Here is my card for the final project All About Layering 1 class AECP Group 17 /Gallery Post-

Nancy S Layering 1 lesson 10
Nancy Souza AEC”P Group 17 All About Layering 1 Final Project

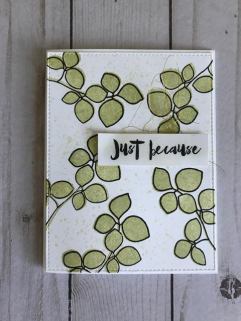
These additional card photos are  some additional cards that I created using the antique rose layered stamps and dies, zinnia layered  stamps and dies and layered leaves.  I have also posted these cards on my Instagram page as well along with several other cards for homework for the All About Layering 1 Class.


Altenew Educators AcademyAll About Layering 1 Gallery 17

I have been busy working on my card samples for the All About Layering Class 1 cards.  I used the leaf canopy stamp again.  This time I stamped the leaf branch outline with Versaclair black ink and then clear embossed it.  I used an Altenew shade of pink to stamp the leaves.  To add interest I used a black Glaze pen to add the dots on each leaf and accents around each leaf.  I added a strip of black and white striped paper, and word tag and some pink Nuvo dots for accents.  Simple color combo. 

Nancy S Layering 1 Lesson 4 Gallery 17
Gallery 17 All About Layersing 1 Lesson 4

Altenew Educators Academyn Class 17 Lesson 3- Awesome Zinnia Card

I am working on the All About Layering 1  course and this is my card for Lesson 3.  I used a large zinnia flower stamp and matching die. This set also had the matching leaves.  I used the mini ink bundle in shades of pinks. I die cut the flower and leaves from the coordinating dies.  I used a gingham printed paper with a scalloped edge die from My Favorite Things.  The stamped sentiment is also from an Altenew stamp set.  Time to post on the Class Gallery!

Nancy Souza Layering 1 Lesson 2 Gallery 17

Altenew Educators Academy Group 17

I am working through the All About Layering 1 Lessons which focus on techniques for using the layering stamp sets.  I learned how to align the layers of inked stamps by making guiding pencil marks for aliging the next stamped image.  I used the Antique Rose set, the Canopy Leaf set and the Zinnia set.  Here is Lesson 2 that I used the Antique Rose smaller rose stamps.

Nancy Souz Layering 1:Lesson 2 Gallery 17
Gallery 17 All About Layering 1 Lesson 2


Aletnew Educators Academy Layering Class 1-Leaf Canopy Stamp Set

I have been a rubber stamper and card maker for over 20 years.  I enjoy teaching classes and sharing with friends in my  studio space at home.  With the current health pandemic and staying at home, I was searching for a new way to learn new ideas and techniques while at home. I discovered the call out to participate in the Aletnew Educator’s Academy.  I have used Altenew stamps for a long time, especially their beautiful flowers and leaves.  So this was the right time to learn new ideas and techniques right from home. Perfect!  I recently was accepted to the Altenew Educator’s Academy AECP  and belong to Group 17.  I was excited to be accepted. 

  • Lesson 1 focused on techniques for layering  so I had to search my Altenew stamp collection and the inks I would use.  The only layered stamp set I have is the Leaf Canopy  set.  I have used this stamp many, many times for many different occasions and love its simplicity and diversity.

  • The Leaf Canopy set includes two solid leaf sprigs and two outline matching sprigs.  I selected two different shades of Ranger distress green ink-mowed lawn and shabby shutters to add shading to the stamped leaves. I selected Versamark black ink for the outline stamps
    NancyS Level 1 pg

  • Now it was time to practice.  Using the smaller outline stamp, I tried a few on Neenah white cardstock using the black ink. Then I inked  the leaf  which I had on an acrylic block using the shabby shutters light green ink. Aligning the solid image to fit inside outline image. Practice was helpful to create a good  image.  As I was practicing I was planning the layout for the final card homework.

Nancy S Level 1

  • My final stamped image for the used the smaller leaf sprig.  I stamped the outline with the black ink five times on Neenah white cardstock so the images trailed off the sides of the  quarter piece of paper.   Then stamped first with the light green ink and again with the  same ink to create a more solid image.  Then ink spattered with a fan brush to add visual interest  to the white paper.

  • I stamped the Just Because sentiment from Altenew on white paper, trimmed to size and lightly inked with green ink. I like to add visual interest and added a gold thread bundle to the back of the word tag.

  • I die cut the stamped cardstock using a stitched edge die from My Favorite Things and used my favorite tape runner to add double sided tape and glued it to my card front to create the A2 card. I added some clear Wink of Stella to the leaves for  a subtle shine.

  • I added  foam tape to the word tag and then adhered the gold thread to the sticky foam and added it to the card front.  I like the simplicity of the card and how it can be used for multiple occasions just by using different sentiments.

Nancy S Level 1 jjpg

  • Supplies-  Altenew Leaf Canopy stamps, Altenew sentiment, My Favorite Things stitched die cut, Distress green inks, Versamark black ink, Neenah white card stock, Wink of Stella clear pen,  foam tape, Scotch brand tape runner, gold thread, fan brush, acrylic blocks, mini spray bottle for water