
A STENCIL IS SUCH A VERSATILE CARD MAKING TOOL
Having stencils in your card making toolbook is such a great versatile resource and can be used for so many techniques. For these three cards I used the Altenew wonky grid stencil. I created several cards for the Altenew Educators lessons using this stencil and for other cards as well.
I used several different sets of Altenew ink cubes for blending and as watercolors. I used the Smile stamp set and coordinating die for the cards. I liked that there were two options to use for the Smile stamp. Great for a guy/masculine card, too.
The other card I designed was to create strips to mask each band of colors for inked diagonal stripes. I used pink and purple Altenew ink cubes here as well. Something a bit different. Here are the photos of the cards. They were all A2 card sizes using white cardstock. Thanks for stopping by. Give these ideas a try. Happy Stamping!
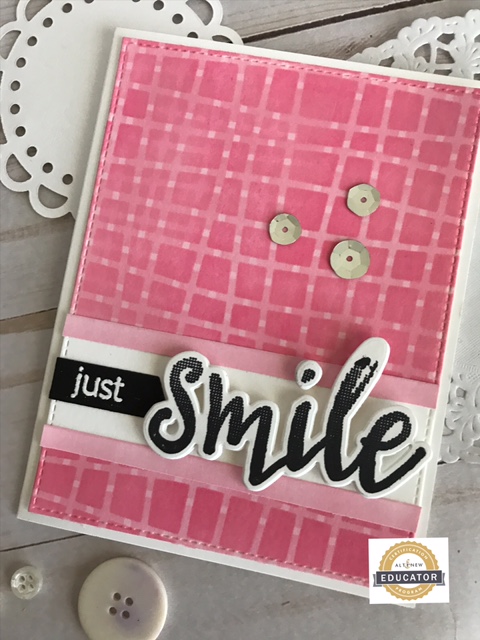
I inked the stencil on white cardstock using a light ink cube. Then I moved the stencil and inked it again using a darker shade of pink from the ink cube set. I stamped the Smile in black ink and die cut the stamped word and also die cut it from white paper to create a dimensional look. . I completed the word tag banner. I added some stick on sequins to finish the look.

I used the same stencil but this time, I inked the stencil with an orange ink cube, sprayed it with water and tapped the stencil onto the wet ink. I repeated the process to cover the white card stock piece of paper. I dried it with a heat tool and trimmed it using a rectangle die for the A2 card front. I used more inked paper for the stamped smile and die cut the word. I drew a black line across the inked paper, stamped the word just and added the die cut smile. You can switch out the color and have a totally different effect.

Another easy card, this one I used a square Post It note to the center of the white card stock. I placed the stencil over the paper and inked through the stencil using a purple ink cube. I removed the stencil and added some dark shading in the corners using a darker shade of purple ink. I stamped the Smile in black ink, added the sentiment and foam pieces to the back of the smile die cut.
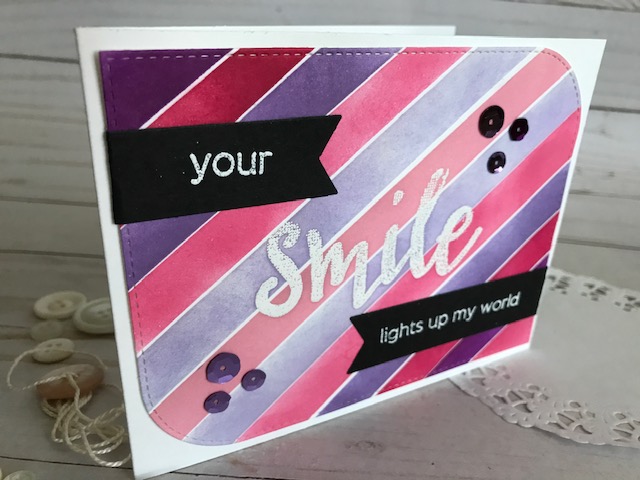
I used thin Post It note paper 1″strips for masking while I inked each section. I used. foam blending tool to apply the ink in shades of purple and pink. I stamped the Smile using Versamark ink and white embossing powder. The other banner were stamped and embossed in white embossing powder. A few stick on sequins complete the colorful card.
Hope you have some ideas to use to create your own cards that will make someone SMILE!
Some
