
It is that time of year when the new academic begins. I created this card to send to my grandson and for some of my teacher friends. I used many different pieces for the die cuts, paper and glittery accents. To create the notepaper, I glued lined loose leaf paper to a piece of card stock and then die cut this using a notepad die cut. The background paper are rulers so I thought that would be appropriate to use. The pencil is an old one from Whippersnappers. I die cut the A+, stamped the sentiment on the bottom and added dotted lines to connect to the sentiment. I added ‘have an A+ year in school’ to the inside. I love how all the pieces came together. A tiny gold star finishes the layout!
Monthly Archives: August 2017
Colorful Squiggle Flowers!
Many times a card sketch or color challenge inspires a card project and this time it was the Sugar Pea Mix It Up Challenge for August-#SPMIU34 challenge I like stripe, dots and circles so I combined as many of these elements as I could. After searching through my collection of paper I could not find a stripe paper that I liked, so I created my own. I cut strips of cool blue paper and added them to a white card base and die cut the background paper. I stamped a trio of flowers and leaves from a Simon Says Stamp set. I watercolored them using Zig markers and fancy cu them out. I also cut out a circle of vellum paper to put behind the flowers. I outlined each flower using a glitter pen from a beautiful set of Kaiser Craft pens. A thread nest behind the flowers add some visual interest. Some glittery Nuvo drops complete the layout. Love the color combo!

Happy Thoughts!
Water reactive tissue paper is an interesting paper to create with. I cut circles from a variety of colors of tissue paper including pinks, oranges and reds. The color from the paper is water reactive when wet and creates wonderful background colors. I am amazed on what the final watercolor paper will look like. I added a die cut word and a small word tag. And of course a few glitter drops. Ready for some special friends for their mailbox. This is a submission for the Sunday Stamps Color Challenge SSC159 Summer Petals using the color challenge.
Perfect Paper Pumpkins and an Apple, too!
Even though it is the middle of summer with plenty of hot days still ahead, I have been working on a fall paper project. I created simple but cute paper pumpkins and one red apple sample. Heavier weight paper works better and double sided as well. Circles and paper strips are the supplies you will need. I used a variety of theme printed paper to cut seven circles for each pumpkin and for the apple. Circles were either four inches for the smaller one or five inches.. Fold each circle in half and glue the outside sides together to form the shape. Add a twisted paper bag stem, vine and some accent leaves. Cute! For the other pumpkin, I cut 12 1″ strips from a 12″ piece of paper. Punch a small hole in each strip both top and bottom. Line them up so the holes are all in the same place. Put a colored brad through all of the pieces top and bottom. Now fan out the pieces to create a ball shape. Again, add a paper bag stem, curly q vine and some leaves. Perfect for a fall display!
A Collection of Clipboards!
Here is a a new collection of kicked up clipboards that I worked on over the weekend. I love the vibrant paper from Dare2bartzy. The coordinating paper is fabulous as I added matching paper and cut out accents to the back and front. I painted the edges and sanded them a bit, Modge Podged the board and paper and let it dry. Then I went back and added the strips of paper and cut outs for accents. Hard to believe that these started out as $1.00 clipboards from the Dollar Tree store. These are going to be teacher gifts for the Christmas holiday! I even made coordinating pens and of course the ribbon was the final touch! 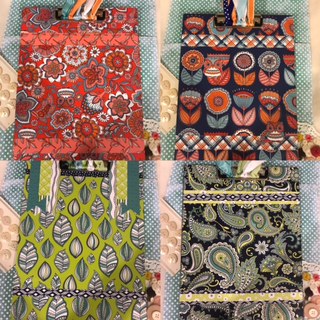
Floral Bouquet!
A card sketch for the Viva La Verve August monthly sketch challenge. I used a variety of patterned papers for the background layout. The stamp I used was from the Catherine Scanlon Art Gone Wild collection. I used Zig markers to paint the flower, added glittery pen accents and a twine bundle from May Arts. I think the dark colors create a vibrant look. 
Paper Banners and Rosettes Wreath
I can’t believe that the craft stores already have Halloween and Fall decorations filling the shelves. I took advantage of the fall printed paper to create a September wreath using a combination of patterns for the banners. I wrapped each paper strip around the wreath and over lapped each strip. When that was complete, I cut a banner shape at the bottom of each paper strip. I took some of the extra paper to create several paper rosettes. I added button accents and twine bundles to the back before gluing them to the wreath. I love the way the paper project came out. Now it is your turn!

