I am a card designer and paper artist who loves creating cards and paper projects. I enjoy learning new techniques and sharing ideas with friends. I am now a Certified Altenew Educator having successfully completed all leveled lessons /challenges and teaching a Zoom virtual workshop. Take a look at my Instagram posts of my paper projects. My favorite color in case you wanted to know is- Glitter!
This simple but elegant card was created using stenciled die cuts as the background from My Favorite Things dies. The tree was created when alcohol inks were randomly applied to the Ranger Ink specialty paper including gold ink accents. A simple tree die cut was added and a small word tag for a final accent.
This was a new technique that I used with alcohol inks using the Ranger speciality background paper. A stamped the Penny Black flower in white and added stencils for accents. A tiny word box was added also using Penny Black word stamps. A different way to create a background.
Time to send out thank you cards and I found this great stamp from Picture Show stamps with a cute Boston Terrier with a party hat. A stamp with black ink, watercolored with distress ink, then die cut banners, background papers. Put all the pieces together, add the accent dots and tie on the thin cording. Last step- is of course glitter glue for accent. Sometimes, less is more!
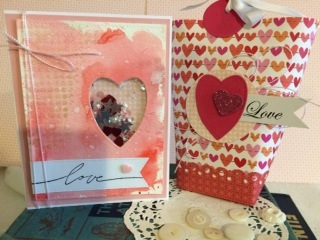
It is time to work on Valentine’s Day projects and I designed a shaker card and treat bag. The card is watercolored using Ranger Distress inks and when dry, a small heart die cut was used to create the opening for the shaker card. I then used a stencil with small openings for the glittery paste. When this was drying I created a small pouch for the sequins and beads using the Fuse Tool. This was attached to the back of the heart opening. Foam tape was used around the opening and edges of the front of the card to secure the pink paper. A word tag banner and tiny heart was attached to the bottom of the card. Then the card was assembled and a thin twine was tied to the A2 left fold. Add a bit of glossy accents to the tiny heart accent. Ready for mailing to your sweetheart! The bag is a bag in a box pattern. Construct a 4 inch box and wrap the patterned paper around the base. Add some accents to the front and ready to fill with sweet treats.
A shaker card and gift page with coordinating paper.
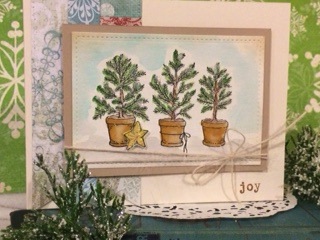
This Impressive Obsession pine trees stamp was painted with watercolored pencils and distress ink background. I used a My Favorite Things die cut for the watercolor paper and My Favorite Things banner die cuts from coordinating scrap paper. A cut out star and glitter glue for accents and a coordinating word tag finish the holiday card. A great card for any winter holiday.
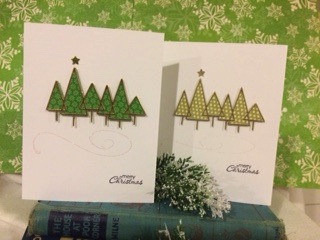
I created a CAS card for my mass production this year. In fact I made 50 of them. I used a Memory Box two step die cut, one for the trees and a shiny paper for the outline of the trees. I love the way they came out. Was a bit tricky gluing the thin outline to the patterned paper trees. A bit of glitter glue, a Stampin’Up sentiment for the front and inside and they were ready for mailing. Love it!
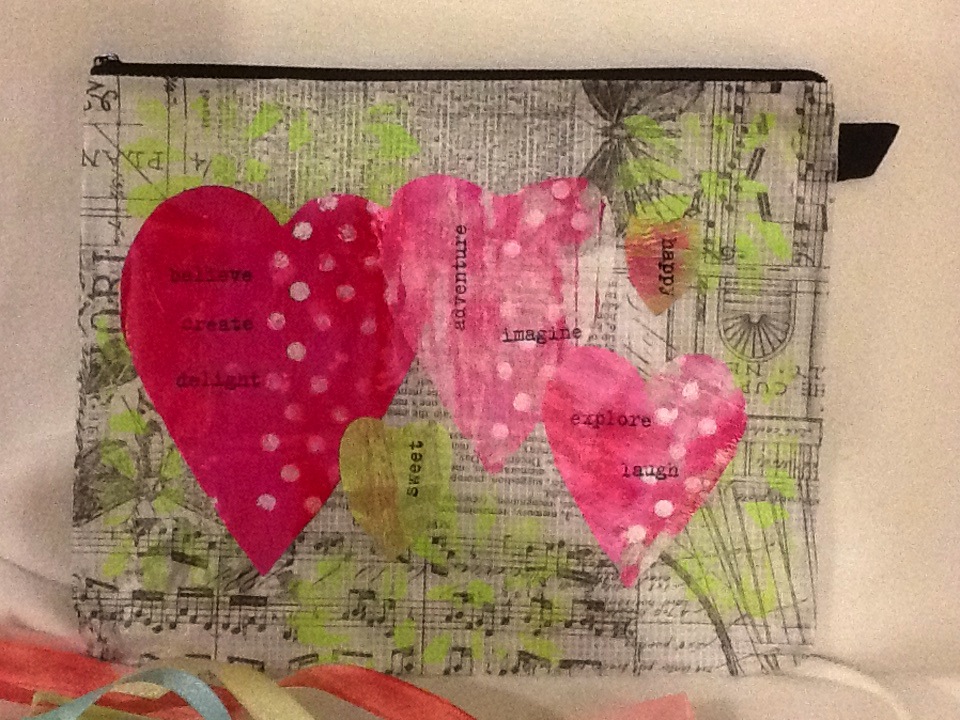
I love the way my pouches came out! I did several different sizes. Each one is covered with Tim Holtz special tissue paper using heavy medium paste. I created painted hearts using a gelli plate and acrylic paints. I applied the hearts to the bag that I had stamped with inspirational words. I added a top coat seal with Modge Podge. Ready for the craft show next weekend at Scrapbook Cove.
A decorated pouch that is covered with Tim Holtz special tissue paper.
Another class in December at Scrapbook Cove! A candy holder that is a cute snowman hat, a mini-pizza box gift and a gift card holder. Holiday paper, ribbon and a bit of accent glitter complete the trio of gifts!
I created a card after a visit with family to several local vineyards for a tour and tasting. I watercolored the stamped image, added coordinating paper and a word tag. I had this stamp for a long time but was tucked away in a drawer and never used. I should have used it sooner!
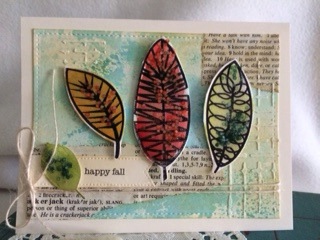
I love stamps that are leaves and have quite an assortment, but this set was different. Very bold and modern lines. I stamped a trio of them using Archival black ink on watercolor paper and used distress inks to water color them. I fussy cut each leaf in three different sizes. I used distress ink for a watery light blue background on watercolor paper. I used My Favorite Things stitched edge die cut for the background paper. I glossy accented each leaf and added mosaic colored bits from my craft drawer archive while the glossy accents was still wet and allowed them to dry. For the background, I added strips of dictionary pages and embossing paste with a simple stencil design. When dry I added accents with light brown distress inks. I printed out a tiny word banner-happy fall on the computer. I also made tiny leaves from My Favorite Things and added glossy accents and mosaic dots. I tied on natural colored jute cording from May Arts (love them) for the final touch on a off white A2 card. I popped them in the mail for my BFF’s! Love the way it came out!!!!