All posts by Espresso Expressions

I am a card designer and paper artist who loves creating cards and paper projects. I enjoy learning new techniques and sharing ideas with friends. I am now a Certified Altenew Educator having successfully completed all leveled lessons /challenges and teaching a Zoom virtual workshop. Take a look at my Instagram posts of my paper projects. My favorite color in case you wanted to know is- Glitter!

Mini-shopping Bags for Special Gifts!

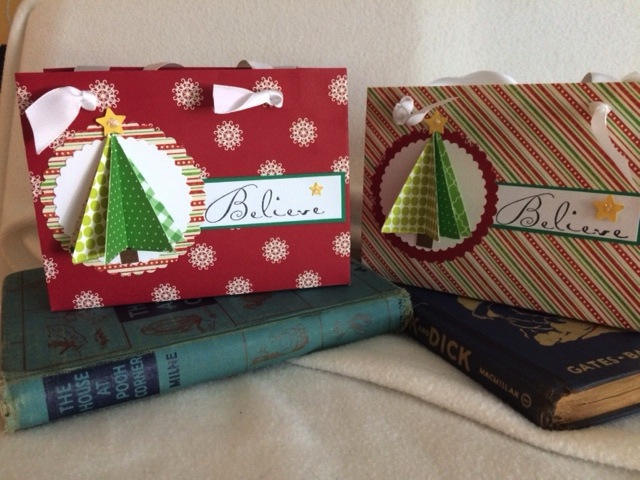
I love making bags and boxes and had the chance to teach a class yesterday at Scrapbook Cove here in town.  Everyone had a choice of making 3 bags either Halloween, Thanksgiving, Birthday, Christmas or Winter.  I have made these mini shopping bags for many different occasions and the choice of paper and embellishments make the bags super special for some special gifts. Now it is your turn!!!

More ideas for handmade gift bags

Put a special gift in a special handmade bag!

Scaredy Cat for Halloween!

Halloween is just a few weeks and Halloween decorations have been in the stores for weeks already. Seems like right after back to school supplies were on the shelves.  I decided to use Halloween and fall patterned papers to create a sunburst effect behind the black cat stamped image.  I colored the cat with Copic markers in light gray with added glittered accents.  A sunburst die cut and purple circle behind it and an accent of silver cording nest add a bit of pizzaz!  A tiny oval word banner with a stenciled accent complete the card on an orange A2 card.  Time to get them ready for the mail for some spooky deliveries.

patterned papers for a great sunburst background

Upcycled and Jazzed Up Pencil Pouch!

I attended a fabulous workshop at Scrapbook Clubhouse on Sunday and I learned how to create a new look on a plain old plastic cosmetic pouch.  The awesome Tim Holtz special tissue paper and the heavy duty paste medium adhered the thin and strong paper to the plastic.  Embellished with marker drawn flowers, or stenciled with acrylic paint transformed the plain old pouch.  Fabulous.  Here is my version using a $1.00 pencil case from Staples!  I used stencils and paint and a cut out hearts. I was even able to stamp on the painted paper with Archival ink!  I see these on my Christmas/holiday gifts to share with friends!   Hope you like my simple and inexpensive version!

Tim Holtz special tissue paper, heavy duty medium and stencils.  Awesome final product!
Tim Holtz special tissue paper, heavy duty medium and stencils. Awesome final product!

Birthday Bling and Sequins!

Creating special birthday cards can sometimes be challenging, especially for my two daughters who have BDays in September. I always want to up my game!  I played around with my new Fuse heat tool and after a few attempts I created a small pocket for sequins and glittery stars.  I used a few new stencils and distress inks from Ranger to create the background. I just got a new set at the Great American Stamp store in Westport, CT from Hero Arts that included a die cut and coordinating stamps.  I filled the clear pocket and tucked it under the word banner to hide the glue tape that I used to secure the filled pocket.  A bit of shiny twine completed the look.  I created a second one using some different colors.  I need a bit more practice, so time to create a few more BDay cards for upcoming birthdays!

A Fuse created pocket with sequins adds some bling!

Ticket Back to School!

I like to send a Welcome Back to School card to my teacher friends- including my retired educator friends. I wanted to create a card that incorporated many new techniques that I have been trying out.  I discovered this fountain pen nib stamp and think it was a limited edition from some company. I printed out a Palmer cursive handwriting method back ground paper and incorporated a page from an old banking check register as well.  I painted the pen nibs and added glossy accents to the ticket.  I used a Ranger stencil for inked accents and colored some texture paste with distress ink and used a smaller stencil.  A piece of dictionary page was added to the end of the tag and a piece of fabric ribbon accent was knotted to the tag.  They are in the mail to my teacher friends!  I love the way the card came out.  My multi media project for #SST weekly challenge!

A multi media ticket back to school!

A Foursome of Circle Flowers!

The weekly sketch challenge for My Favorite Things is a four square layout.  I love the squiggle flowers and die cut from Simon Says Stamp and found that  each flower fits in  small square and scalloped square.  I stamped each flower on watercolor paper and painted each flower and leaves with Ranger distress inks. I added a word banner, tiny heart and glitter glue to each flower.  Ready to mail to a friend!

Water colored flowers and a word banner

Mini-calendar on a Folded Easel Stand

I love the mini calendars that I shared as holiday gifts and have gotten rave reviews.  I also sold them at the craft sale I did before the holidays. It is a handy calendar to have in the home office.  Have to start thinking about making a new set for the 2016 year.  This was a new design that I created from a Pinterest sample I found.

Simple but purposeful easel stand from folded paper.

Double Stenciled Background with Twine Accents

Lately I have been trying different techniques to create backgrounds.  I watched a video by Jennifer Mcguire that I found on Pinterest.  The background is created with a stencil and white pigment ink, dried and then shifted to create a shadow or accent.  The stencil is inked again with a dye ink.  I added a word circle, looped twine and either some sequins or a tiny heart.  Pretty clever. I might need to buy some larger stencils to keep experimenting.

Pigment white ink and blue dye ink for a background
Pigment ink and then dye inks were used for the background

Inked Background and a Colored Flower

The background for the cards was created using alcohol inks in yellow or purple. I inked the stamp pad on the craft map and sprayed alcohol into the mat to create a puddle.  I cut a A2 sized piece of speciality paper and touch it to the inky puddle.  I let it dry and then inked the Magenta flower stamp to the paper.  I added a stamped script stamp in a few random stops.  I used Ranger texture paste to add accents using a circle stencil.  A word sentiment tag was added and an accent border stamp to the bottom. I love the yellow and purple colors. The yellow card was posted to the Monday challenge for Simon says stamp. #sswc

Texture paste using a stencil
Inked background and a inked flower

Perfect Pearls for a Perfect Accent

This is a new technique I tried after watching a video by Jennifer McGuire.  Masking off a section and blending distress inks.  The next step is to brush on silver or gold perfect pearls powder.  The shiny powder sticks to the wet ink.  I selected an embossing folder and embossed the decorated paper.  I layered this piece onto orange paper and then onto the folded card.  A black die cut hello and a few accent sequins finish the CAS look.

Distress inks and perfect pearls accent