
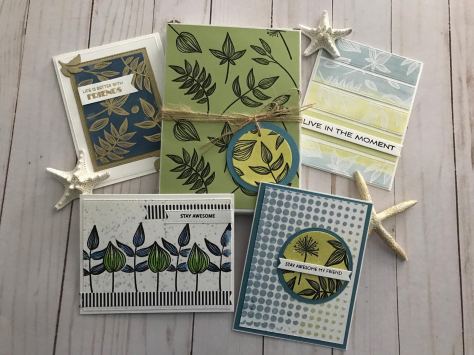
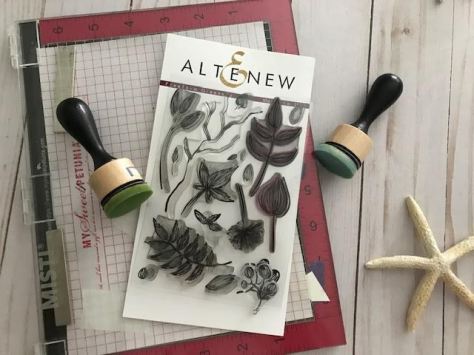
Level 1 Challenge Project For a Special Guy CardsChallenge? or Challenge! I approached the Level 1 Guy Challenge as a way to apply all of the new techniques that I learned and practiced together in one final assignment. I was ready! Or was I? I had to take time to revisit the Altenew stamps and coordinating supplies that I had and to coordinate them with the stamping/card making materials that I in my supplies. Being resourceful and think creatviely was essential to completing the task. I found that taking the time to visit posts from other participants was really helpful and inspiring. I appreciated that resource that Erum shared in an email. I selected the Freeform Greenery stamp set for all of the cards and the packaging project. I have a limited supply of masculine stamp sets and I had not used this set and that added another layer to the challenge. Reflecting on the technique lessons I learned from Level 1, I had to decide what ‘homework’ I wanted to focus on. I chose- Let It Shine, Stencil Techniques and Masking Unleashed. I also applied other technqiues as those complimented my planning and creating each card and the final packaging task. I had a theme that coordinaed all of the pieces and that was color based. All of the pieces included blue and green ink colors and I used stamps from the Freeform Greenery stamp set as my primary stamp set, and some sentiments were from other Altenew stamp sets that I had as the Grenery set did not include sentiments. The techniques in each lesson added to my stamping/card making knowledge. Coordinating these two elements was critical to completing the challenge. The following descriptioins and photographs will explain my card making steps and the resources/materials that I used. A list of supplies and materials is included at the end of the post.

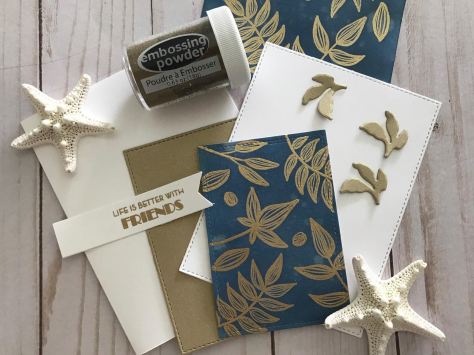
Card 1- Life Is Better With Friends /Primary Technique- Let It Shine
I began with a piece of 3 1/4″ x 5 1/2″ piece of heavy weight white card stock and used my MISTI stamping platform to stamp the entire piece of paper. I positioned the stamps on the paper to cover as much of the paper as I could. I used an embossing anti static powder prior to stamping. I used Versamark ink to stamp the images, then added the Stampendous detail gold embossing powder and heat set the stamped images. I moved the paper and not the stamps and repeated the process. Then I used a foam applicator tool and Ranger Stormy Sky distress ink to cover the entire paper. I repeated the process to add more ink to create a dark background. I added some water splatters for some visual interest. I buffed the piece with a paper towel to remove some of the blue ink that was covering the gold embossed leaves. I die cut the inked/embossed paper using a stitched edge die from My Favorite Things. I die cut another piece from gold card stock and a larger white piece of card stock for a layered look. I stamped the sentiment using Versamark ink and gold embossed that as well. This was a My Favorite Things banner die cut. The small leaf accents were die cut from the same gold paper and are from the Altenew Leaf Cluster die set. This added some visual interest to the corners and helped to balance the card layout.

Supplies and Tools
Stamps- Altenew Freeform Greenery, Altenew sentiment
Dies- Altenew Leaf Cluster die, My Favorite Things stitched rectangles and banner
Ink- Ranger Distress Ink- Stormy Sky, Versmark watermark ink, VersaFine Clair Nocturne black ink, VersaFine Onyx black ink
Embossing Powder- clear embossing powder, Stampendous Detail Gold
Paper- heavy weight white card stock, gold card stock
Tools- Sizzix die cutting machine, Fiskars cutting tool, MISTI stamping platform, 3M Tape Runner, Scor Pal scoring board, heat tool, blending and foam pad handle, Fiskars scissors, non static powder pouch, Lawn Fawn white craft glue
Card 2- Stay Awesome/ Primary Technique- Masking Stamped Images
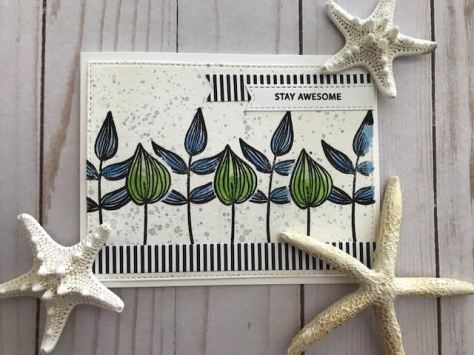
The layout for the second card was a horizontal half sheet of heavy weight white card stock, scored at 5 1/2″. Other paper was Canson watercolor paper cut to a 3 3/4″ x 5 1/2″ I continued to use the Altenew Freeform Greenery stamp set and selected only two stamps from the set. The single leaf bud and the five leaf stem. The technique for the card was creating a mask that would cover the primary stamped image to create an illusion of a background image for the five leaf branch. I stamped the single leaf twice on a 4″x 4″ squares of Post It paper close to the sticky edge. I then fussy cut the images. Then I adhered the single leaf stamp to Ranger clear acrylic grid block and inked the stamp using VersaFine Onyx black ink. The first image I stamped was the middle one and then two other images to the right and left for a total of three. I covered the leaf stamped images with the Post It masks and stamped four leaf stamp between the stamped images for a total of four new images. I removed the Post It masks and now I had created the illusion of images th were in the foreground and recessed. I have used this technique before and the stamps have simple outline shape, it was easy to create the Post It paper masks.
Hint- I orginally used Mask It sticky plastic masking paper and the stamped leaf stem was very thin, the mask was challenging to adhere to the paper. I went back to using Post It paper instead. That was successful!
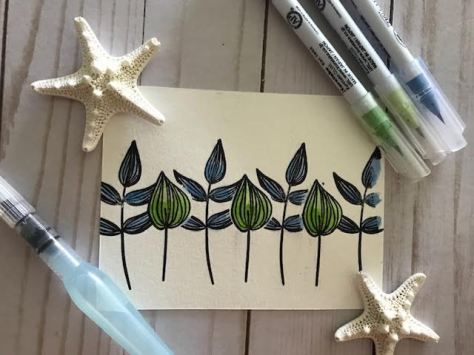
Next, I used Zig water based markers in light green and slate blue and a water barrel paint brush to add color and shading to the stamped images- green for the single leaf and blue for the five leaf stem. I added paint splatters to add interest to the background using a puddle of blue Zig marker and a fan brush to tap in the splatters. I stamped the Altenew Stay Awesome word using black Versafine ink nd die cut a banner. I die cut the stamped piece using a stitched edge rectangle from My Favorite Things. I added the black and white stripe die cut banners from a paper pad from My Favorite Things. I tucked the top banners behind the stamped piece. My 3M tape runner was used for gluing the card together. I used my T square ruler to line up the final stripe banner to the bottom edge of the card
I used the element of three for the banners and the three primay single leaf images. Clean and simple stamped images and basic colors.


Supplies and Tools
Stamps-Altenew Freeform Greenery, Altenew sentiment
Dies- My Favorite Things stitched edge rectangle and banner die
Ink- VersaFine Onyx black ink, Ranger distress Stormy Sky blue ink
Markers- Zig water color markers- green and blue
Paper- Cason water color paper, white card stock, My Favorite Things black and white stripe paper pad
Tools- MISTI stamping platform, T square ruler, Fiskars cutting tool, Scor Pal scoring tool, Sizzix die cutting machine, white glue, 3M tape runner, Post It 4×4 note sticky paper pad, Fiskars scissosrs , fan brush
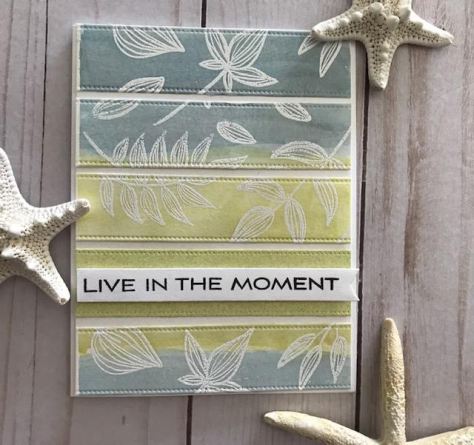
Card 3- Live In The Moment- Impressive Heat Embossing and Water coloring background
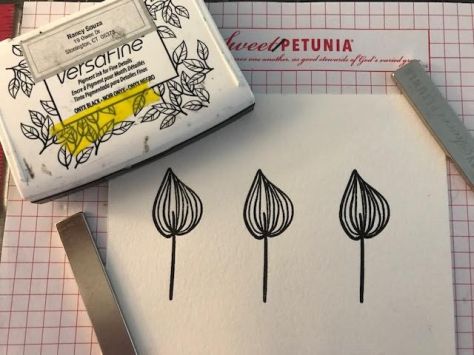
The third card in the For The Guy card set focused on heat embossing and water coloring resist painting. A fairly simple technique but with great results. I decided to revisit this technique as this stamp set had stamps with outline images instead of solid images and this would allow the painted background to fill in the spaces of the stamped and embossed images. I used mixed media paper pad and cut a quarter sheet of paper which allowed me to have more room to stamp. Then I could decide where I wanted to trim the paper for the card front. I used the MISTI stamping platform to plan out the position of the stamps to cover as much of the paper as possible. I used my embossing anti static powder pouch before stamping. I then stamped the leaves using Versmark watermark ink, heat embossed using Stampendous white embossing powder. After heat setting, I moved the paper in the MISTI stamping platform to finish stamping the rest of the paper. I repeated the same process as before.
HINT- stamping a second piece of paper as a backup was helpful as I did use the second piece!
Next was water coloring . I am a big fan of using Post It wide paper tape instead of other tape adhesives. It does the job, is reusable and is not super sticky and does not tear the paper when removing if from the paper. I taped both pieces of stamped paper to my glass work mat. A size 14 round brush, a small container for water, the same distress ink as before, Stormy Sky and Shabby Shutters. This would be my paint source. I swiped the ink on my glass work surface, lots of water and I created colored bands on the paper, alternating between green and blue. I removed the paper tape, dried it with my heat tool, turning the paper over to avoid warping of the paper. I wanted to create die cut stripes, so I used an large die cut banner from My Favorite Things that had a stitched edge. It was shorter than the paper I used but that was fine as I knew I was going to trim down the paper to fit the A2 card front. I used both pieces of the paper I stamped and painted in the process of gluing I had a few pieces I did not want to use. I followed the green and blue pattern and for the fourth strip I substituted a light green card stock piece as that was the piece I was going to add the sentiment banner. I started to use a teal piece of card stock for the solid paper, but it was too dark, then I used the light green piece instead. The I added them to a white piece of card stock and trim the painted paper and the background paper so it would be slightly smaller than the card front. I used my T square ruler to line up the sentiment before gluing to the card front. I liked that I had an odd number of strips (five which included the solid piece of green paper). The sentiment strip was from my collection of sentiments from Altenew. I wanted to continue the theme of friendship for the set. Another clean and simple guy friendship card.


Supplies and Tools
Stamps- Altenew Freeform Greenery, Altenew sentiment stamp
Inks- Ranger distress inks Stormy Sky and Shabby Shutters, VersaFine onyx black ink, VersaMark water mark stamp pad
Embossing Powder- Stampendous white embossing powder
Dies- My Favorite Things banner dies
Paper- mixed media paper, card stock , green card stock
Tools- Sizzix die cutting machine, 3M tape runner, Size 14 round paint brush, Post It 1″ wide paper tape, Sizzix paper trimmer, Scor Pal score board , white glue, T square ruler
Card 4- Stay Awesome My Friend Primary Technique- Stenciling and Embossing Paste

For the last card in the set I used a newer type of embossing paste. It is from The Crafter’s Workshop/ TCW and it is called Light and Fluffy. It has a lighter texture and dries quickly. After revisiting some of the Level One videos and planning for the last card, I thought that a card that had texture would be a good addition to the set and also use the color group of blue and green. The Altenew Halftone Stencil is one of the few Altenew stencils that I have and one that I reach for often in many of my cards and mixed media projects. I like the graduated dots and works for a variety of cards, including cards for the either gender. I used my glass craft mat to mix ink from the same two distress inks- Stormyn Sky and Shabby Shutters. I used a plastic palette knife to mix the ink colors with the fluffy embossing paste. I use white card stock and taped it to my glass work surface. I alternated colors and started in the left hand corner with the blue paste that I tinted and then gradually changed to the green tinted paste. The paste dried quickly and that was good. While that dried, I worked on the rest of the card pieces.
Hint- rinse off the stencil right after using, including the palette knife and the work surface. Keeps all of the tools ready to use the next time. Taking care of my tools, extends their crafting life.
Next, I used white card stock and stamped using VersFine Clair Nocturne black ink. I really like this line of inks. It can be used for direct to paper stamping and can also be used with clear embossing powder to heat set the stamped images. I have several of these ink pads. I then inked the stamped paper using the Shabby Shutters distress ink using the foam pad blending handle. I covered the paper and the inking created a nice contrast with the black stamped leaves. I used a new die set of stacked circles from Essential Circles by Heather for Essentials by Ellen. This set is unique as it also die cuts an outline circle that can be used with the the circles or alone. The set has 15 stacked circles so I can die cut lots of different combinations of circles. I used a piece of teal paper for the stitched edge circle as a contrast and continuing with the blue theme. I also used the same paper behind that had the embossing paste to tie together the colors. A stamped sentiment from my Altenew sentiments die cut using a mini banner die from My Favorite Things. I used double sided tape and foam tape for dimension to finish up the card. I like the texture and continuing visual interest of using circles and dots.


Supplies and Tools
Stamps- Altenew Freeform Greenery, Altenew sentiment
Inks- Ranger distress ink Stormy Sky, Shabby Shutters, VersaFine Onyx black ink, VersaFine Clair Nocturne black ink
Embossing Powder- clear embossing powder
Dies- My Favorite Things banner die, My Favorite Things stitched circle die, Essential Circles by Heather for Essentials by Ellen
Embossing Paste- TCW The Crafter’s Workshop Light and Flufy Modeling Paste 2 oz jar
Stencil- Altenew Halftone Stencil
Paper- white card stock, teal blue card stock
Tools- Sizzix die cutting machine, 3M tape runner, Post It 1″ wide paper tape, Sizzix paper trimmer, Scor Pal score board , white glue, T square ruler, handle with foam pad for ink blending, plastic palette knife
One More Project- The Guy Gift Box
I repurposed a flat paper box that I had saved from a long ago holiday craft project and discovered it in a drawer. I used coordinating green card stock and stamped the leaves and stems from the same stamp set that was used on the cards. This time I heat embossed the images using VersaFine Clair Nocturne black ink and clear embossing powder. Trimmed for the front of the card box. I use a left over stamped and ink piece of paper and circle die cut and a slightly larger circle die cut to create. tag. I wrapped twine from May Arts aroud the box and tied a bow. I punched a hole in the tag and tied that to the box as well.


Wow, these are gorgeous! What a terrific set!
Thanks! Has to do lots of thinking and planning as this was the only stamp set that was a guy set worthy. Thanks again!
These are the prettiest guy cards I have even seen!! I love them. Love the colours! Beautiful work!
Thank you for entering your work to the AECP assignment gallery. Awesome work!
Thanks so much!!! Your comment made me so happy. Glad you liked them. Same planning with this set- color theme and using one stamp set to be creative. I started with this task as I knew it would require lots of planning. 😊thanks again.