
NEW TECHNIQUES FOR COLORFUL CARDS!
This lesson focused on techniques to add visual interest and included watercolor resist, masking and inking, focal point, repeated stamping, inking and shading and ideas to repurpose the Altenew stamps and supplies that I had in my collection. I like using bright colors in my paper crafts and these lesson techniques will be applied to many of my paper projects. So great to learn new techniques. Hooray!


Here is the list of stamping techniques that were covered in this class-
- Golden Garden- using stamps to create a wreath shape
- Generation Stamping
- Ink blending and Flicking
- Masking and Blending
- Watercolor Resist and Multistep Stamping
- Smoosh Inking Technique
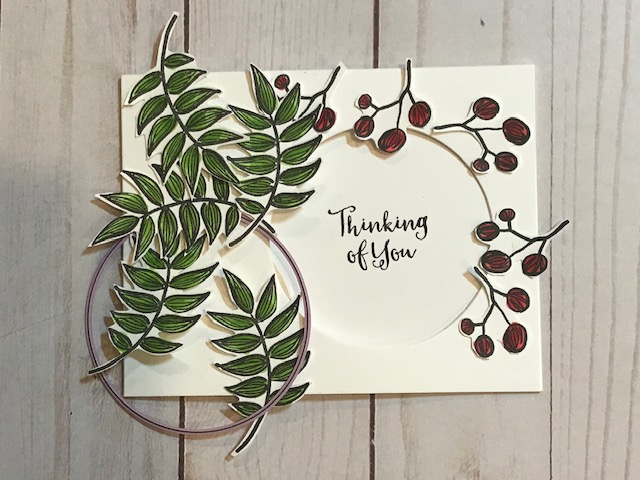
CARD 1- GOLDEN GARDEN WREATH

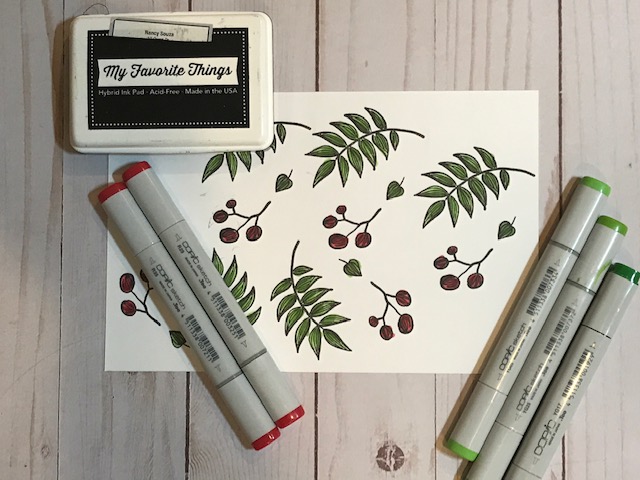
This lesson focused on how to multi purpose a leaf branch stamp to create a wreath around the edge of a die cut circle. After watching the lesson video I had to search my collection of Altenew stamps that would work to create a rounded edge. I used the Freeform Greenery stamp from Altenew. I stamped the branches several times using My Favorite Things black hybrid ink. This is a great ink to use when using Copic markers to color and shade. I stamped the branch five times, colored with Copic markers and fussy cut each branch. I also stamped a small bunch of berries and colored with Copic markers in shades of red. The front of the card had a large die cut circle and shaped the branches around the circle opening, overlapping when I needed to. I tucked in the colored berries and there were some I had to trim. I cut another circle, slightly larger than the opening on the front and stamped “Thinking of You” in the middle of the circle. I glued this circle inside the front cover. This also covered the inked leaves that were in the opening of the circle and created a clean surface inside the front of the inside of the card. I added Nuvo clear drops to each berry. Clean and simple and multipurpose as I can also use this layout for a holiday/Christmas card. My take away– the importance of thinking creatively to get more use of the stamps and materials that I have.


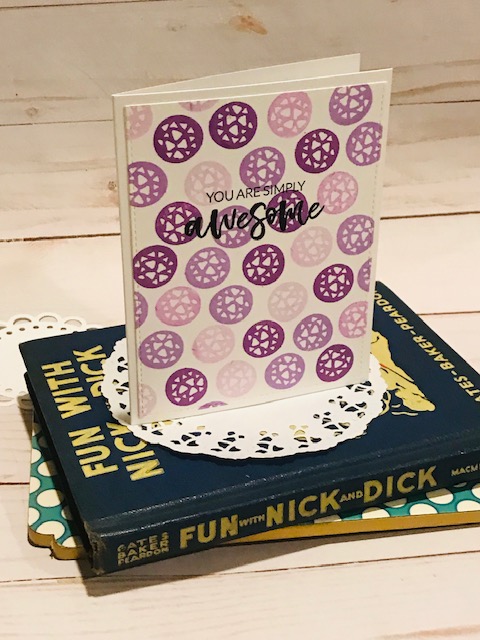
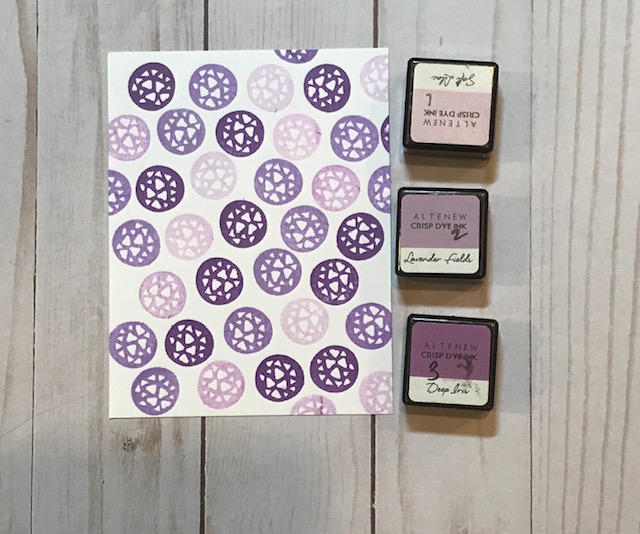
CARD 2- GENERATION STAMPING

This second lesson focused on the technique of multi generation stamping. Again I had to rethink what stamp I was going to use as I did not have an outline shape like was used in the class video so it was time to revisit the stamps and resources that I had. I used a small circle stamp from the Funky Flower set. It was small enough where I could stamp the image lots of time that would cover the entire front of the quarter sheet of white card stock. I used my MISTI stamping platform to secure the paper and the position the small stamp. I stamped the funky flower using Altenew ink cubes in a variety of shades of purple. I inked the stamp, stamped the card stock and then moved the paper and re-stamped for a lighter image. I also changed the inks, and repeated the stamping. Where there was a empty space I went back and added another funky flower. The variety of purple hues created an interesting card front. I stamped the sentiment- You Are Simply Awesome from the Build a Flower Flourishing Zinnia stamp set. I die cut the piece using a stitched rectangle edge from My Favorite Things. I use this layered die set often for a finished piece for a card front. My take away- restamping to create a faded image and using multicolored inks to create a clean and simple card front and that can be adapted for multiple occasions.


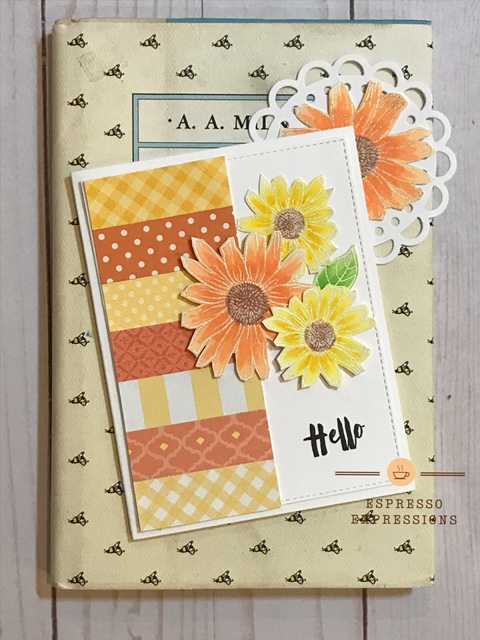
CARD 3- INK BLENDING AND FLICKING

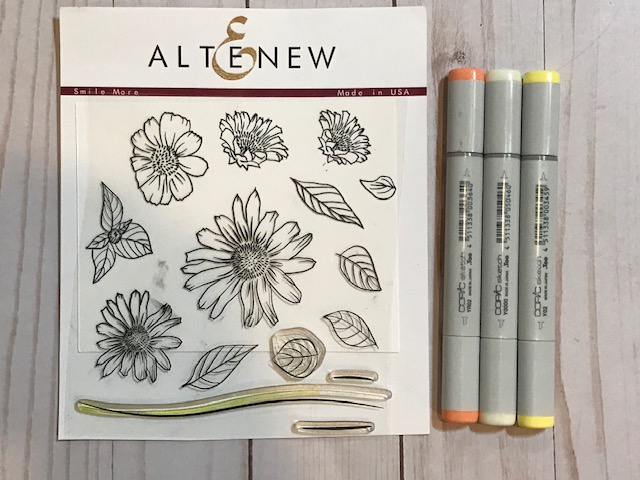
This next card lesson used a variety of techniques to add color to a stamped image beginning with applying ink to the flower and flicking on another layer of color using coordinating colors from Copic markers to ‘flick’on shading. I went back to my collection of Altenew stamps and selected the small daisy stamp from a set I have used many times. I did not have a coordinating die so that helped me to decide what flower I wanted to use. I stamped and embossed the image with white embossing powder on white card stock. I used a foam blending handle to add yellows and orange inks using Altenew ink cubes. I could color outside the lines of the flower which made it easier. Then I added flicks of darker coordinating colors using Copic markers. I did the same steps for the leaves. The lesson video shared a great technique to create visual interest using colored paper accent. I selected pieces of patterned paper in shades of yellow and orange and added them to a strip of white paper. Then I trimmed it to create the piece I would add to the card front. I die cut the white card front piece using the stitched edge rectangle die from My Favorite Things-my go to die! Added the accent strip and I stamped the Hello in the bottom right hand corner. The last step was to add the flowers using foam tape or glue. My take away– was another technique to color stamped images and the patterned paper strip for visual interest.


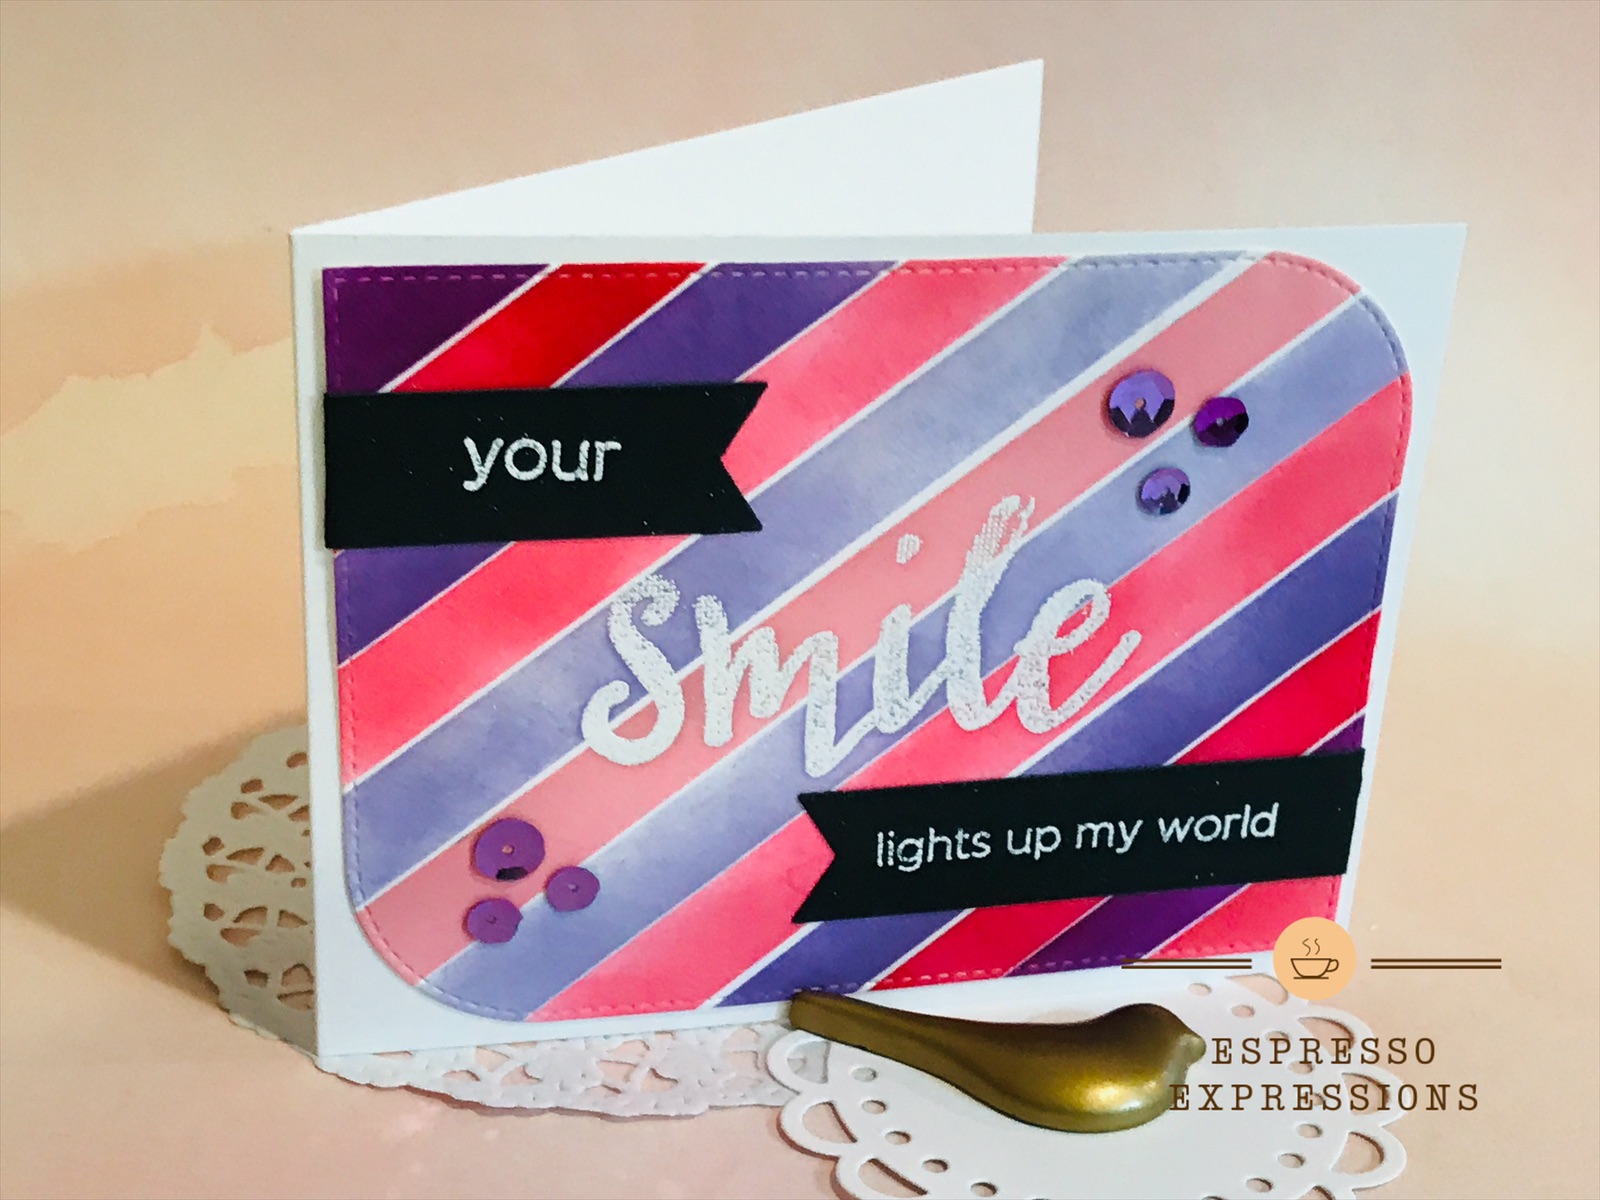
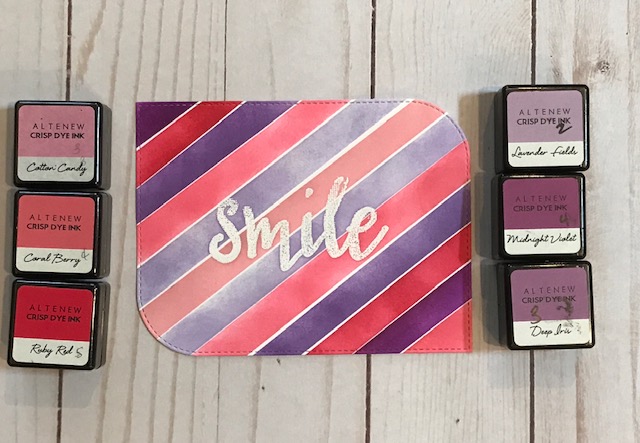
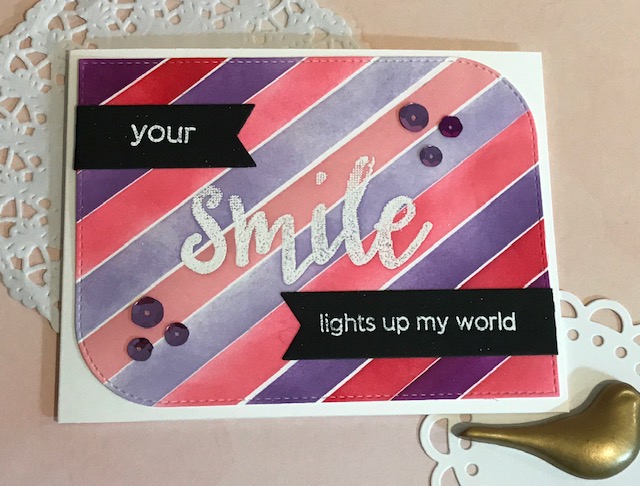
CARD 4- MASKING AND BLENDING

Lesson 4 focused on a masking technique and blending inks. Another lesson that I had to think’outside’ the box. I searched through the stamps and inks that I had. I had plenty of 1″ Post It paper tape that I could use to mask off areas to create inked stripes. First I stamped and embossed the half tone smile stamp on white card stock. I selected ink cubes in pinks and purples from Altenew. I marked off a 1/2″ strip to begin the inking creating a diagonal pattern. After the first stripe, I marked off another 1/2″ stripe and covering areas that needed to be kept clean. I used purples and pinks varying the colors as I covered the quarter sheet of card stock. I buffed the inked piece when I was finished to remove any extra ink. I used the Mod Square die from My Favorite Things to die cut the piece. I stamped and embossed the remaining sentiments on black paper and die cut those as well. I assembled the card to a half sheet of white card stock and added stick on purple sequins for a bit of bling. edaway– this was an easy technique to create a background paper.


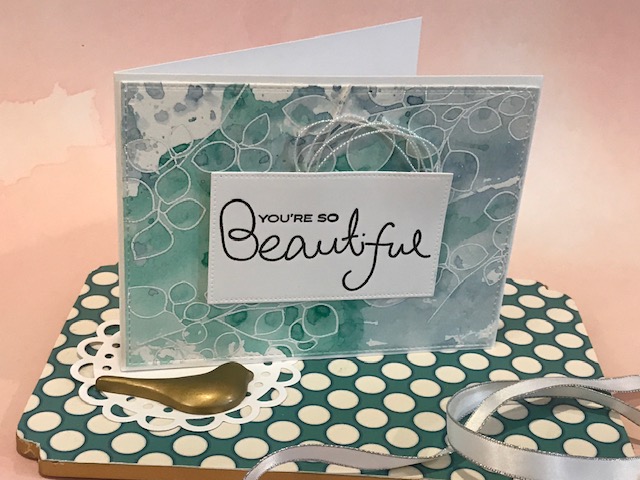
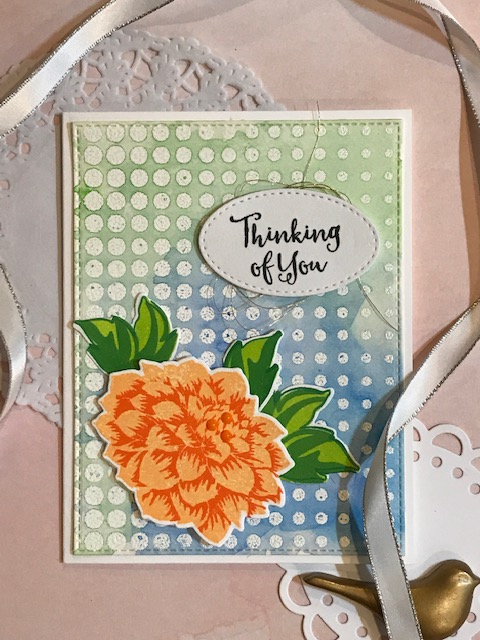
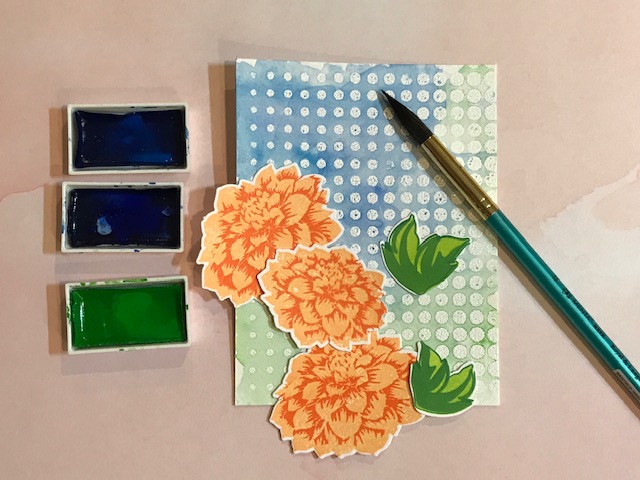
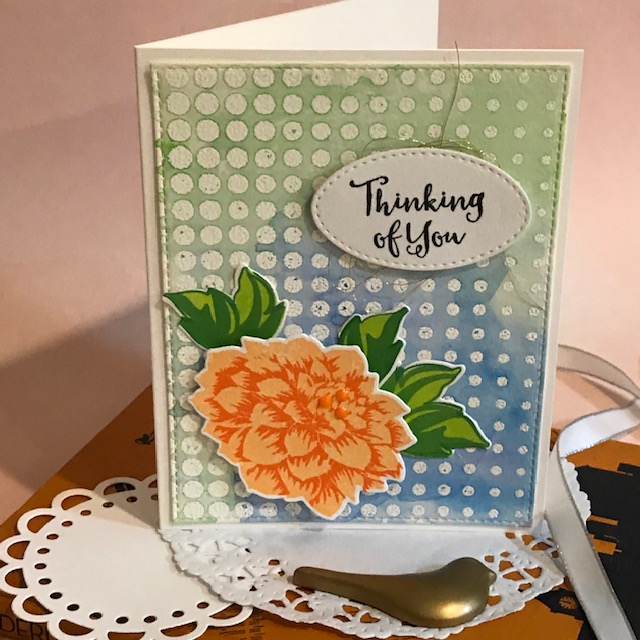
CARD 5- WATERCOLOR RESIST AND MULTISTEP STAMPING

On to lesson 5 and this technique was to create a background. Another card where I had to made modifications. I used the half tone dot stencil from Altenew and white pigment ink to create a background on watercolor paper. I added white embossing powder and heated the powder. Next step was to watercolor the paper. I used several different colors from the Kuretake watercolor set in blues and greens. I blotted the excess water with paper towel to dry the paper before applying another color to keep the colors from over mixing. I had extra layered flowers and leaves from the dahlia set from another card projec. I stamped the sentiment and die cut it using a stitched oval shape from My Favorite Things and also the stitched rectangle die. I added some gold thread behind the oval before I put all the pieces together. My take away– l liked that I could use a stencil to create an embossed background for watercoloring. Another option to extend what I have in my stamping collection.

CARD 6- SMOOSH PAINT RESIST
CARD 6- SMOOSHING INK RESIST
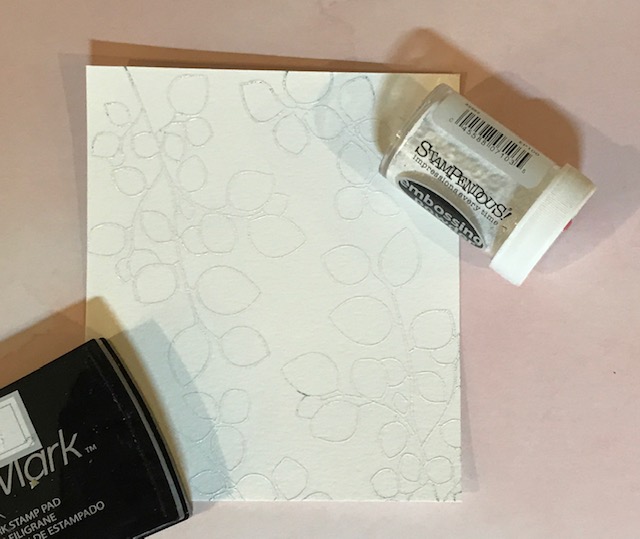
The last lesson in this series of class videos. The technique used a stamped and embossed image and then added watercolored ink and a piece of clean acetate. Once again, I reached for the Altenew leaf canopy stamp set. I cut a piece of watercolor paper to a slightly larger quarter sheet and stamped and embossed two of the leaf branches using the MISTI stamping platform. I wanted to cover most of the paper background, I picked distress inks-Evergreen bough and Stormy sky to create the ‘smooshed’ background, I swiped the green ink onto the plastic and sprayed with water to create puddles and touched the plastic to the paper and dragged it across the paper. I used some paper towels to pick up the really wet areas and used a heat tool to dry the paper. Then I added the blue ink using the same technique and overlapped some of the colors but kept the blues and greens clean. When dry, I die cut the piece using the same MFT stitched edge die. I stamped the sentiment using Versaclair black ink that I used clear embossing powder to create a crisp image. I added some white twine for accent and attached the sentiment to the card front. My take away– I really liked the smooshing technique as it is very versatile and can be used for many different cards and occasions.


SUPPLIES AND RESOURCES
STAMPS– Altenew leaf canopy, free form greenery, funky flowers, halftone smile, daisy, dahlia, build a flower flourshing zinnia and stamped sentiments
DIES– Altenew dalhlia flower and leaves, daisy and leaves
INKS– Altenew ink cubes pinks and purples, oranges , yellow and greens
STENCIL-Altenew half tone dots
DIES– My Favorite Thing- stitched rectangles, stitched ovals, banners, mod square and circle
INKS AND PAINTS– Distress ink Stormy sky and Evergreen bough, Versaclair black, Kuretake watercolor Blue #63, Blue #64 and Green #51
MARKERS-Copic YG 05 Salad green, YR 02 Light orange, Y06 Yellow, E13 Light suntan, YR02 Light orange, Y13 Lemon yellow, Y19 Napoli yellow, Y000 Yellow fluorite, YG25 Celadon green, YG17 Grass green, R29 Lipstick red, R35 Coral
OTHER- white embossing powder, Park Lane/Joanns stick on sequins, Post it paper tape, antic static powder, MISTI stamping platform , heat tool, Canson watercolor paper, white card stock, Scor Pal scoring tool. Fiskars paper cutter, May Arts twine, pieces of pattern paper-yellow and orange, Nuvo clear accents, 3M foam tape, 3M glue tape runner

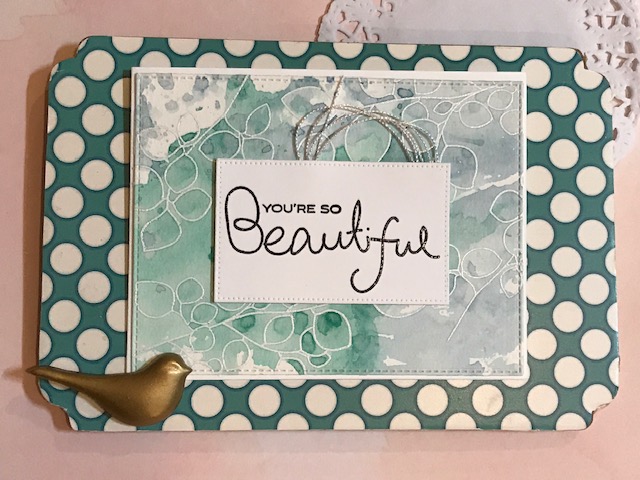
Your first card and your last card are my most favourite of the lot! Love the look of the first one with clean lines and lots of white space. The cards 5 and 6 and inky and shows how much fun you had playing with colours. Love the colours on card 2 and 4 and the flawless ink blending on 4. I like the pattern play on card 3.
Thank you for submitting your gorgeous work to the AECP assignment gallery. Well done!
Thanks so much Erum!!! I appreciate the positive comments and feedback. I really had to challenge my card making skills and resources to address the technique in each lesson/video. One more lesson to go! Thanks again!!!