This newest Altenew release for October includes beautiful and inspirational new stamps, coordinating dies, stencils. I created several cards using these beatiful new releases. I hope you are inspired to create your own cards!
GIVE AWAY PRIZES
Altenew is giving away $15.00 gift certificates to four lucky winners! Please leave a comment on@altenewllc’s post and or each Designer’s Instagram post on the Hop list. Altenew will announce the winners on @altenewllc’s post on October 21, 2022.
Please join me for the newest AltenewMonthly Marvelous Monthly Series for the month of October. There are a total of $300 in total prizes! To celebrate this release, Altenew is giving away a $50 gift certificate to two lucky winners and a $25 gift certificate to eight winners! Please leave a comment on theAltenew Card Blogand/or each designer’s Blog post on the Blog hop list below by October 18, 2022 for a chance to win.
Giveaway Prizes
Altenew will draw ten random winners from the comments left on each stop of this Blog hop and announce the winners on the Altenew Winners Page on October 19, 2022.
October 2022 Monthly Subscription Release
This newest Altenew release includes awesome Stamps, Coordinating Dies, Stencls, Embossing Folders.
The items include- Build-A-Garden: Dear Dahlias 6 x 8 Stamp Set and Layering Stencil, Craft-A- Flower-Epiphyllum Layering Die Set, Craft Your Life Project Kit: Casual Bouquets 6 x 8 stamp set and Die set, simple coloring stencil, Mini Delight: Wild Geraniums 3 x4 stamp set, Paint-A-Flower: Waterlilly Dahlia 4 x 6 stamp set.
Here are my cards that I designed using the stamps, dies and stencils from this set. Enjoy and hopefully be inspired!
TECHNIQUES AND MATERIALS I USED
Here are the techniques, materials and resources that I used to create these new cards- layering, inking, die cutting, painting, embossing, coloring with alcohol markers. Have fun and enjoy! Thanks!
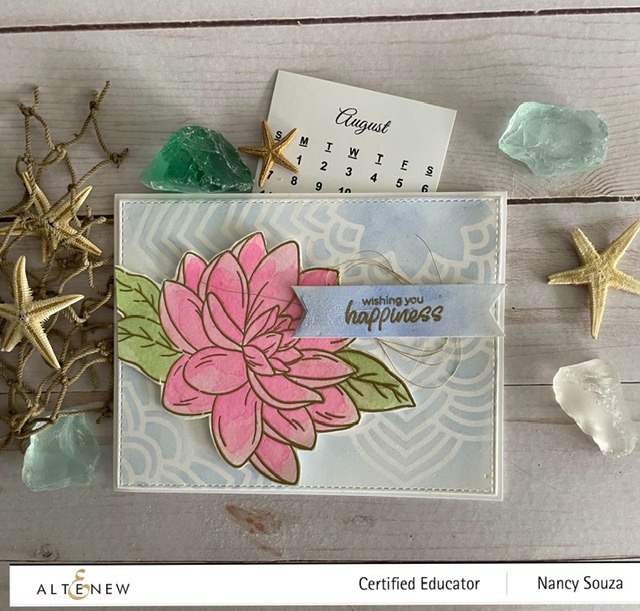
Watercoloring using Altenew watercolor paints for the Waterlily Dahlia
Stenciled backgrounds using Altenew ink cubes and Altenew stenciling brush
Inking white card stock to create and blending for shades of colors for the Epiphyllum die cut flower pieces
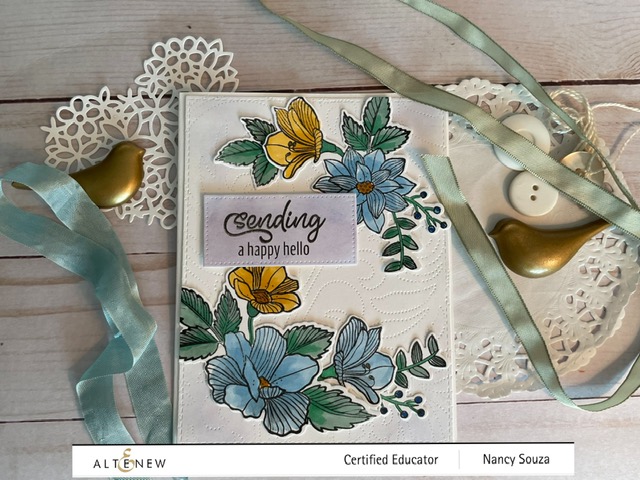
Coloring, shading and blending using Altenew alcohol markers for the Casual Bouquets stamp and die set
Inking and blending colors for the layering stencils for the Mini Delight: Wild Geraniums and die cutting pieces
Inked and shading background for the Altenew Dotted Swirls debossing plate
Stamped and Altenew watercoloring the Dear Dahlias flowers. Triple layered and die cut watercolored petals for the Dahlia
Debossing plate and ink blended background
Blog Hop Order
Here is the list of Altenew designers. Leave a comment for a chance to win prizes. Have fun and be inspired
HELLO AND WELCOME TO THE MAKE IT MASCULINE INSTAGRAM HOP AND BLOG POST!
Here are the cards I created using a variety of Altenew resources- stamps, coordinating dies, nesting die set, dye inks, 3D embossing folder, stencils, alcohol markers, pattern paper.
IT’S TIME TO CHECK OUT THE AWESOME INSTAGRAM POSTS!
Hi, friends! Altenew Certified Educators are joining a fun Blog Hop, and the theme is “𝐌𝐚𝐤𝐞 𝐢𝐭 𝐌𝐚𝐬𝐜𝐮𝐥𝐢𝐧𝐞” showing off projects for the men in your life! The Hop starts from @altenewllc, so make sure you start from the beginning!
Altenew is giving away a $20 gift certificate to five lucky winners! For a chance to win, please follow @altenewllcand and leave a comment by 09/01/2022).
Head over to your NEXT STOP-
@made.by.michi
@espressoexpressions– YOU ARE HERE!
@channellingmarthaau
Altenew will draw five random winners from the comments left on each stop of this Instagram Hop and announce the winners on Altenew’s Educator Instagram Hop post on 09/02//2022.
TECHNIQUES AND TIPS FOR THE MASCULINE CARDS
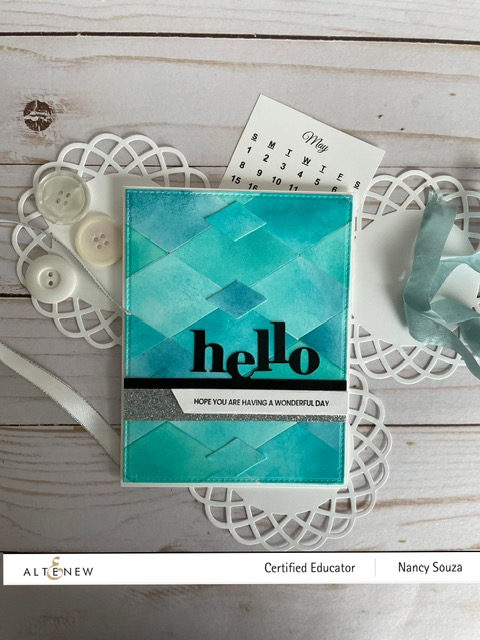
Altenew Diamond Nesting Die set
QUICK TIP– ink and blend a 1/4″ piece of white card stock using a combination of Altenew ink cubes in shades of blue and turquoise. Die cut the inked paper and using the Altenew Fine Frames Diamond nesting set to die cut the diamond shapes and add them to the 1/4″ sheet of white card stock. I added the smallest diamond die pieces to the center of the inked pieces.
QUICK TIP- use glossy black card stock for the die cut Hello. Add silver glitter washi tape as an accent piece for the word tag.
Altenew 3D embossing folder and die cut Hello
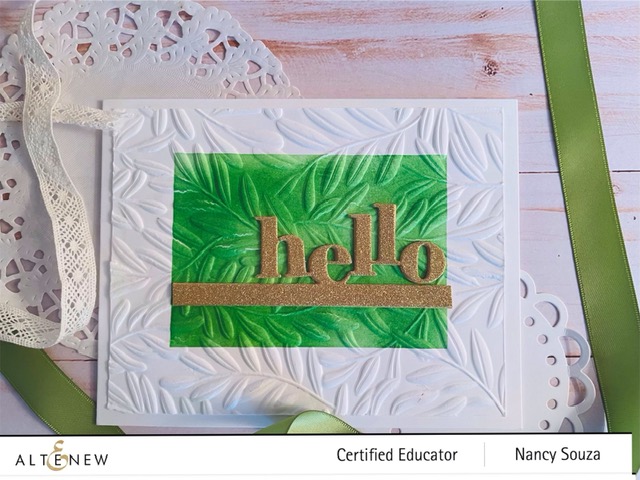
QUICK TIP– cover the 1/4′ piece of white card stock to crate a border to create a rectangle section. Ink the section using a variety of Altenew ink cubes. Remove the masking paper covering the sides of the paper. Use the Altenew Curving Leaves Botanical 3D embossing folder to and a die cutting machine to create the embossed image.
QUICK TIP- use gold glitter card stock for the die cut Hello. Die cut it again and glue together for added dimension.
Altenew pattern paper layout
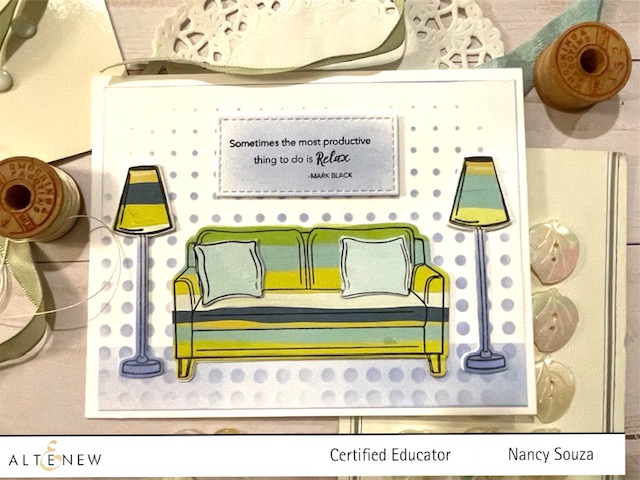
QUICK TIP- use patterned/printed paper to stamp and die cut the couch, pillows, lamp shades and floor lamp bases. Die cut another set from white card stock to add dimension to the furniture pieces. Create a picture frame stamping a sentiment from the set and cut into a rectangle
QUICK TIP- create a background using a Altenew gradient dot stencil and light blue Altenew ink cube.
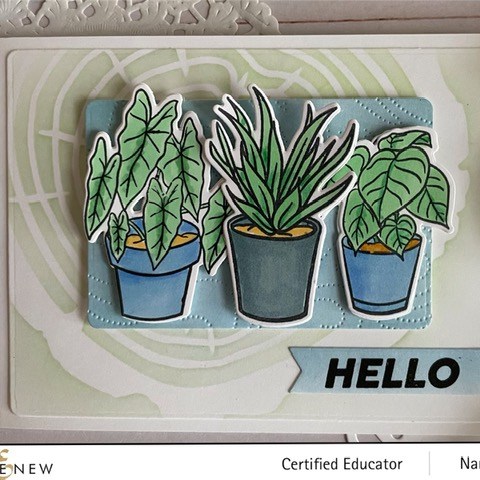
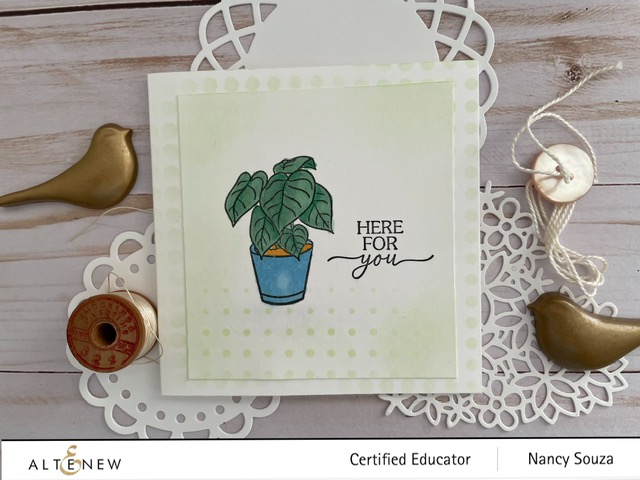
Altenew potted plants
QUICK TIP- stamp the three potted plants on white card stock. Color and blend using Altenew alcohol ink markers. Die cut the colored images and die cut another set from white card stock for layering and added dimension.
QUICK TIP- use Altenew’s Dotted Swirl debossing plate for added interest behind the colored potted plants. Use the Altenew tree ring stencil for the background.
QUICK TIP-ink a piece of small strip of white card stock using one of the coordinating ink cubes for a coordinating stamped Hello word tag.
$300 in total prizes! To celebrate this special Blog Hop,Altenew is giving away a $50 gift certificate to two lucky winners and a $25 gift certificate to eight winners! Please leave a comment on the Altenew Card Blog and/or each designer’s blog post on the blog hop list below by 09/06/2022 for a chance to win. Altenew will draw ten winners from the comments left on each stop of this blog hop and announce the winners on the Altenew Winners Page on 09/08/2022.
Here is the Link to the Altenew Card Blog where the Blog Hop will be hosted:https://wp.me/p6Dps1-gy8
TAKE A LOOK AT THE CARDS THAT I CREATED USING ALTENEW ALCOHOL INKS!
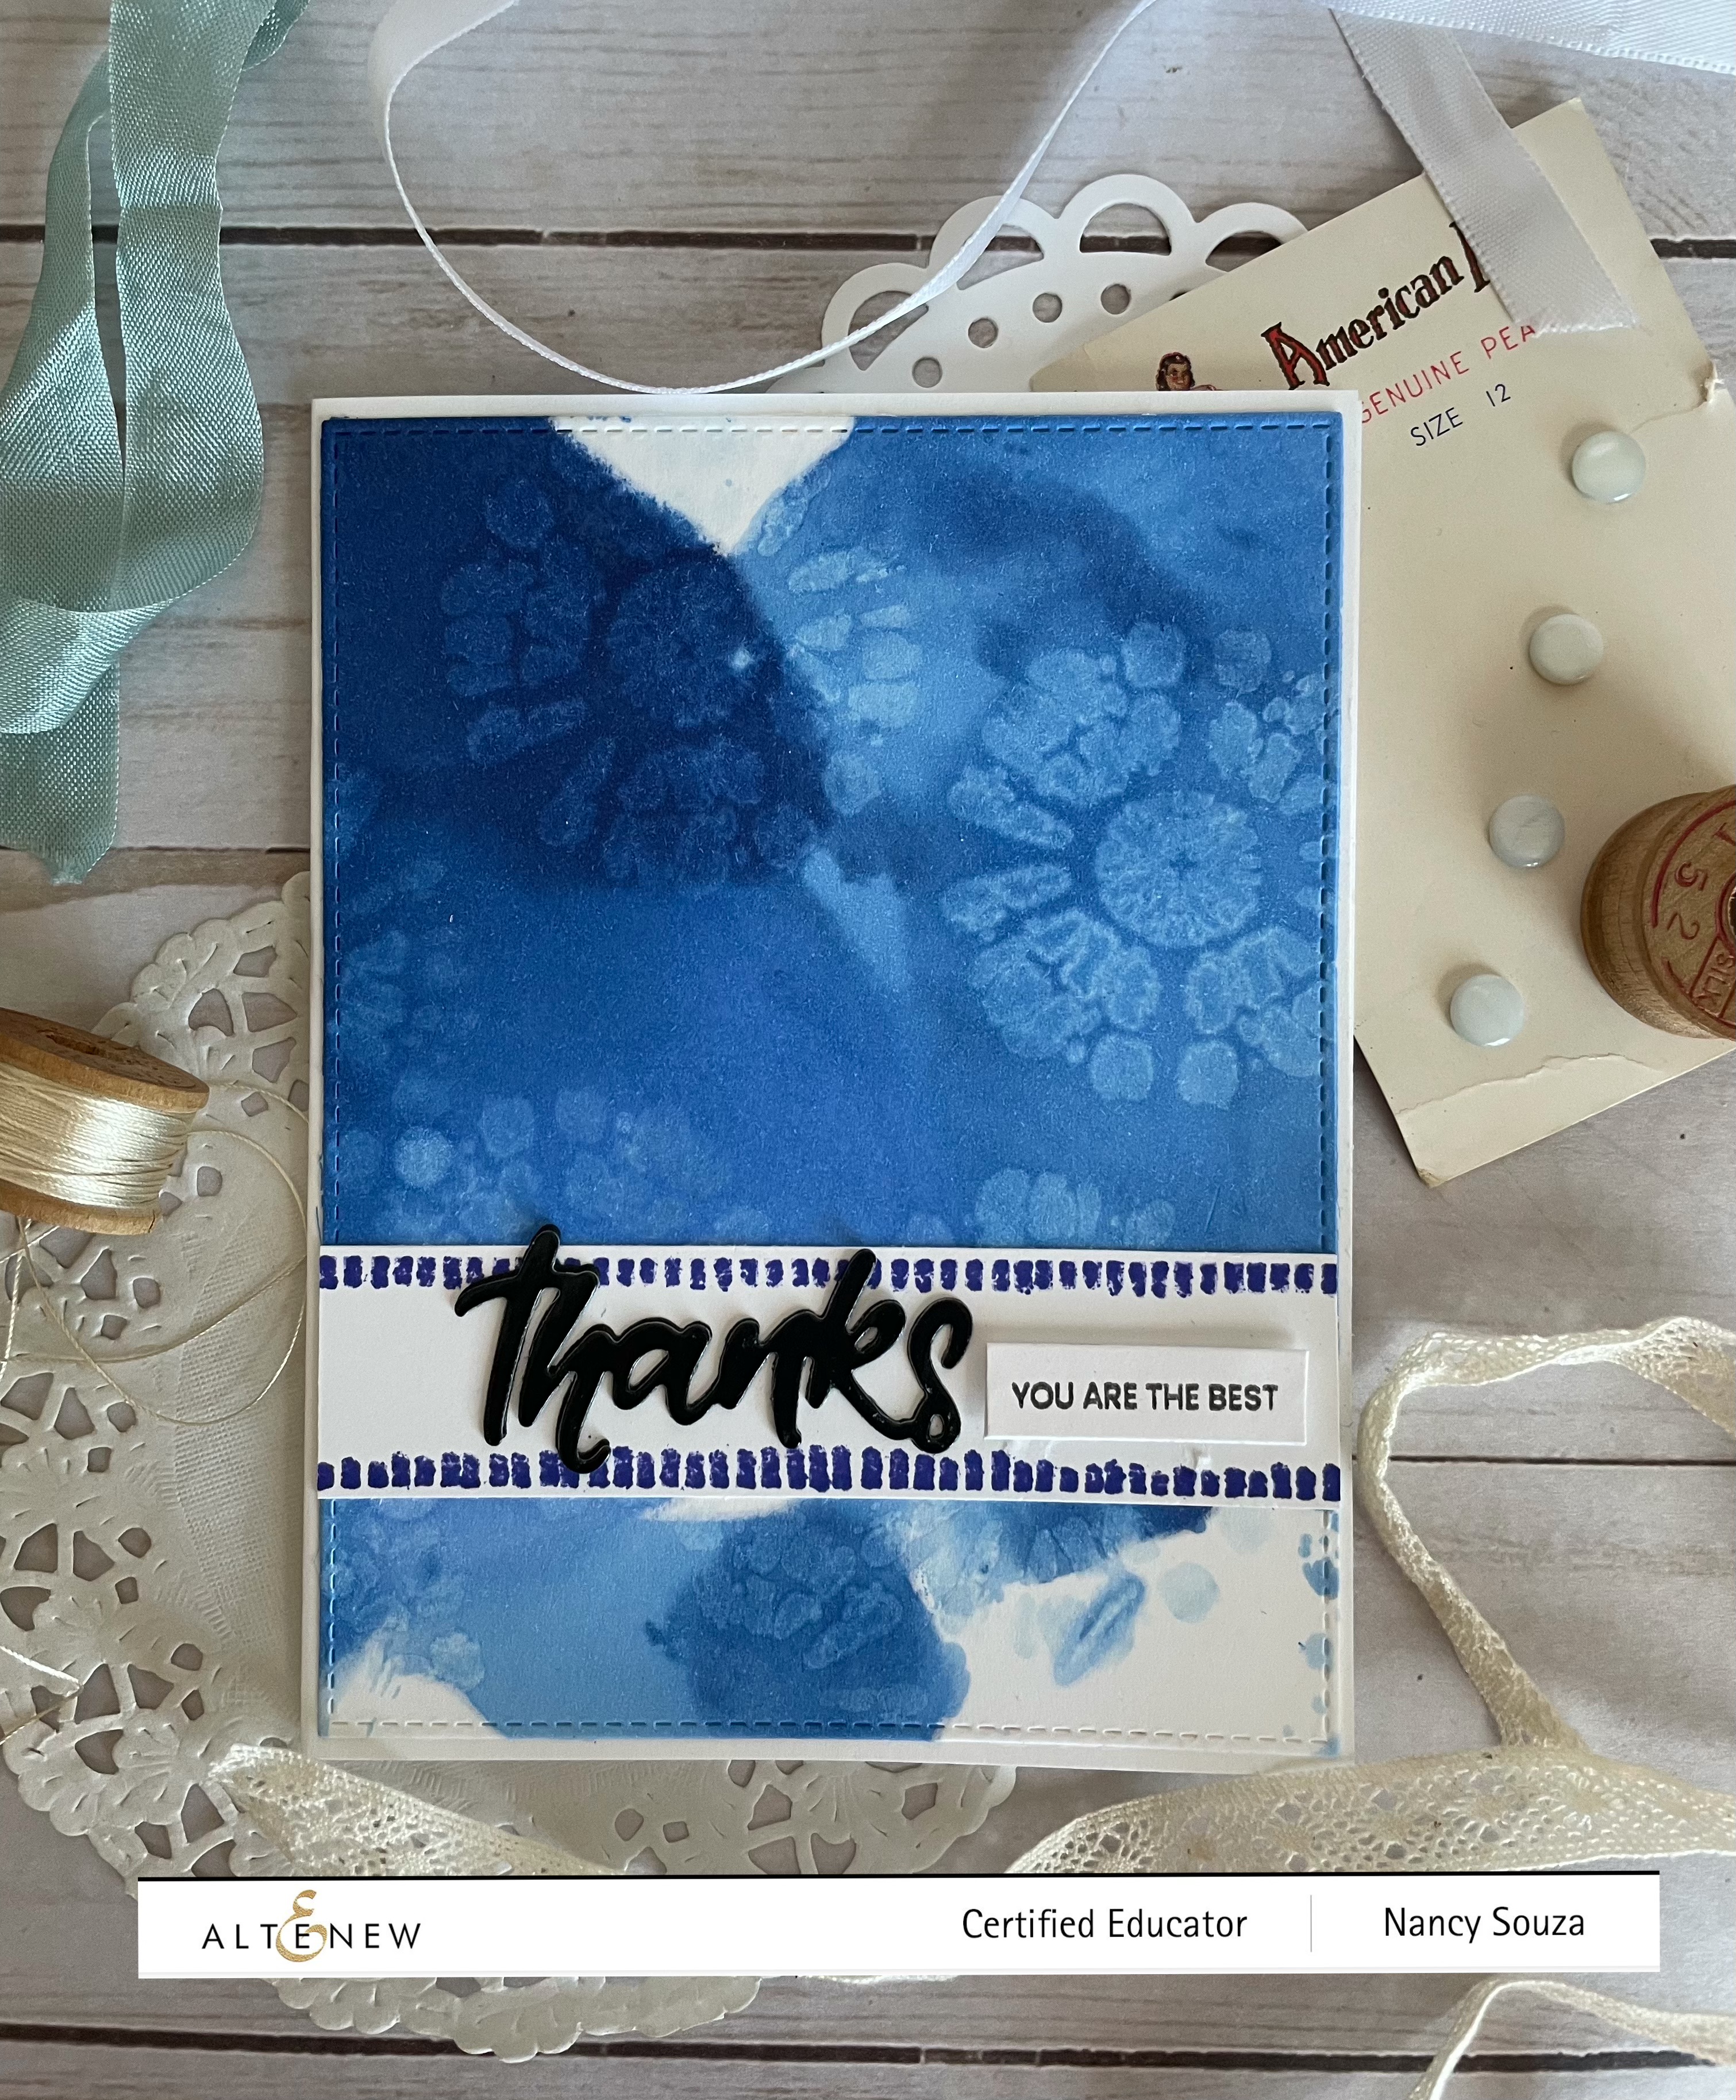
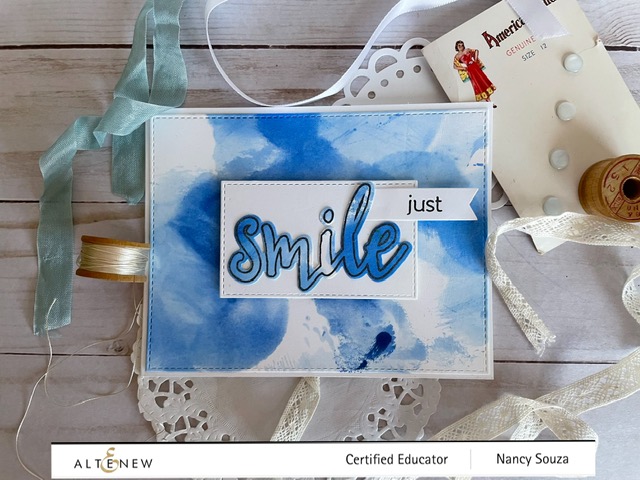
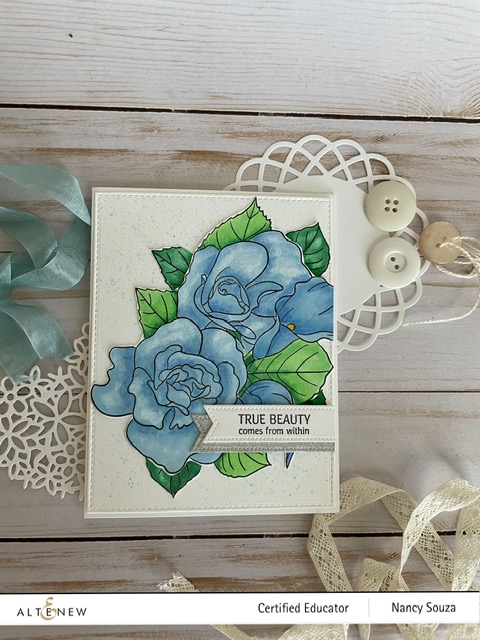
For each card I created an alcohol inked background using two different Altenew alcohol ink refills-Eastern Sky B003 and Azurite B027 and 91% alcohol to create a diluted mix. I mixed the liquids using a palette knife and then I dragged quarter sheets of heavy weight white card stock through the mix or tapped the paper to the mix. I let the inked paper dry.
For Card 1 I die cut three pieces using AltenewLacy Doily die for the card front. I also added texture for the white background paper using AltenewDotted Swirl debossing plate. I trimmed the die cut pieces to cover the white debossed white card stock, I added a stamped word banner. This is a great die and can be used for many different projects.
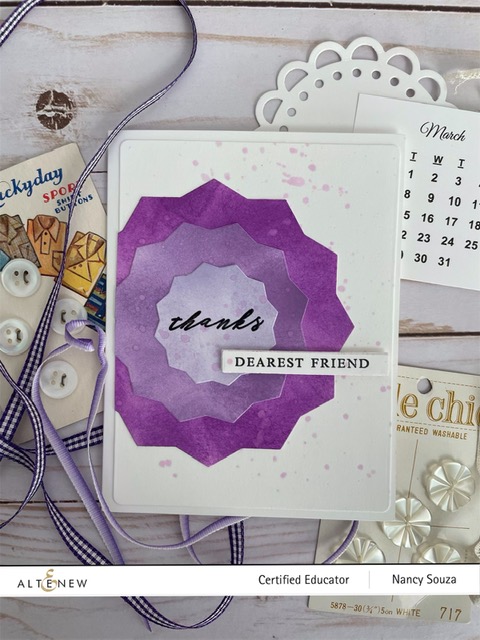
For Card 2– I used the darker Altenew alcohol ink refill and 91% alcohol to mix together for a darker background. Again I mixed the two using a palette knife and dragged and tapped the heavy weight white card stock to the mixture. I let it air dry. When dry I used AltenewHalftone Smile outline to stamp the image to the middle of the inked paper. I used the coordinating outline die to cut the smile. I then used a small rectangle die from My Favorite Things and white card stock to cover the space from the smile die space. I stamped the coordinating word banner from the set. I liked the tie dye effect on the white paper.
For Card 3 I created the same darker shade of Altenew alchohol inks and 91% alcohol to dilute the color and mixed them together and let them dry. I used the Altenew Tie Dye Motifs stamp set to create a the next step. I used the middle size stamp on an acrylic block and stamped it to a puddle of clean alcohol ink and then stamped it to the background paper and it lifted the color from the inked paper, I let the paper dry. The word tag was stamped using the a stripe stamp from the set. A die cut Thanks from black glossy paper and a tiny word tag to complete the card.
All three cards used different techniques and just using only two Altenew alcohol refill inks and repurposing Altenew stamps and dies. Give it a try!
ALTENEW BLOG HOP ORDER! HERE IS A CHANCE TO VISIT AND BE INSPIRED!
Hello and welcome to the newest Altenew Card Blog! The theme is ‘Clean and Simple” card projects. I created several cards where I used only one stamped image on a smaller card base. Love the clean and simple cards.
ALTENEW CARD MAKING SUPPLIES AND TECHNIQUES
I used the Altenew sentiments Pots and Plants outlne stamp set for the stamped sentiments. The stamped plants were singles and were Altenew Elegant Alicasia, Potted Succulent and Adorable Anthurium stamps. I inked the background using the Altenew Half tone stencil using the Arctic ink cube. The stamped plants were colored using Altenew alcohol markers- C103, C015, B027, G245, G315, G201, G011, G213. The card base size is a 4 1/2″ square white card stock.
PRIZES! PRIZES! PRIZES!
There is a total of $130.00 in total prizes! Altenew is giving away a $20.00 gift certificate to three lucky winners and a $15.00 gift certificate to four winners! To win, please leave a comment on the Altenew Card Blog and or on each Designer’s Blog Post listed on the Blog Hop list below by 7/03/2022.
There is more! Join our PARTY! I have included an Inlinkz at the Altenew Blog for you to enter your beautiful Altenew “Clean and Simple” creations.
Altenew will pick ONE of your favorite creations from those who joined the Linky Party and they will receive a $10.00 Altenew gift certificate!
Altenew will draw five random winners from the comments left on each Blog Hop stop and announce the winerw on the Altenew Winners Page on 7/04/2022.
I just participated in the four day Anniversary Crafter 2022 Class, Four awesome card making lessons with great techniques and ideas. The card making bundle of supplies included- Midsummer Bouquet Outline Stamp set, Morning Flowers Layering Stamp set and a 6″ x6″ Scalloped Frame Geometric 3D Emboss8ng Folder. There was a Floral Spring layering stencil in the class bundle that I did not use for a card this time but a welcome addition to my stencil collection.
Each class covered a different technique which was great. Here are my completed cards!
Midsummer Bouquet Outline Stamp set
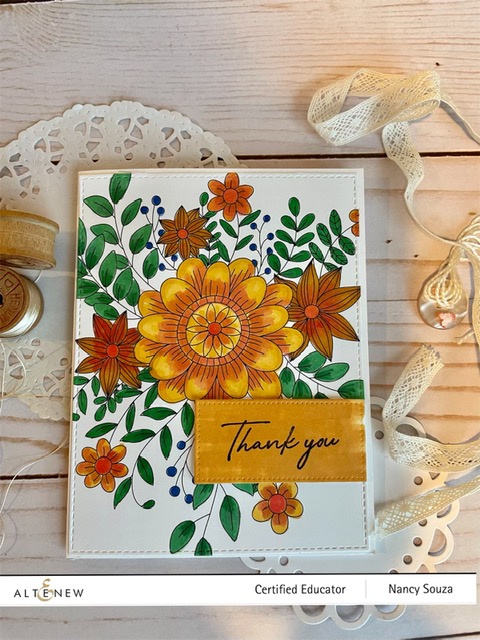
The technique for this card was coloring, blending and layering using Altenew alcohol markers. I stamped the flower using permanent black ink on white card stock. This was double bloom image with leaves. I had some extra leaves from another stamped image and used a darker green marker for contrast. I fussy cut the image and added it to white card stock trimmed for an A2 card. I tucked the extra leaves behind the image. I stamped a matching sentiment. I used silver glitter washi tape- I doubled the tape to create a wider banner and die cut both the sentiment and and glitter banner. That is a quick tip to create a wider strip of tape.
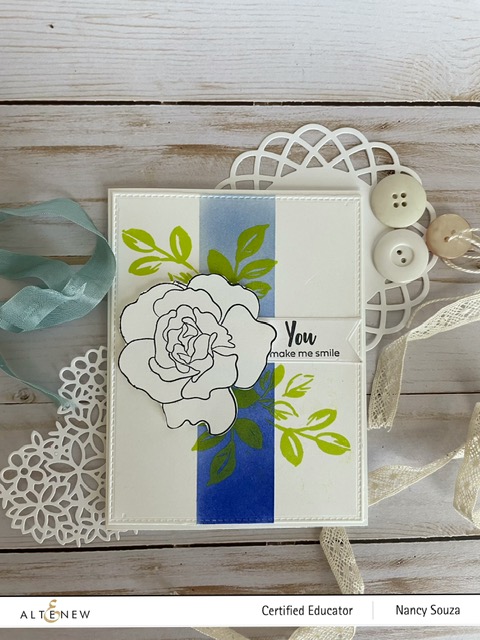
Ink blending strip
This ink blending technique created a colorful masked stripe. I used wide Post It paper tape to mask off the section that I ink blended using Altenew blue ink cubes going from darkest to lightest. I stamped two leaf sprigs from the Morning Flowes layering stamp set with bright green ink. I stamped the rose from the same stamp set as the first card and fussy cut the rose. I stamped a word tag and tucked it behind the fussy cut the rose and layered it with foam tape. This was a great technique!
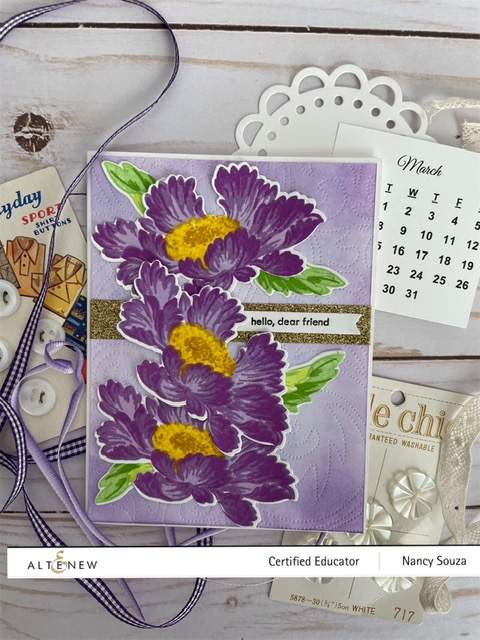
Embossing Scalloped Frame
The focal point of this card is the Altenew Scalloped Frame Geometric 3D Embossing Folder. I used a piece of watercolor paper, sprayed a light mist of water before embossing. That was a helpful suggestion from the class. While I was waiting for the paper to dry, I stamped the rose on watercolor paper and painted it using Altenew ink cubes in shades of purple. I used the same ink colors to paint the embossed scalloped frame. I splattered on the piece including the space in the middle. I added a stamp sentiment banner, I added this inked piece to an A2 white card base, then added the rose with foam tape and tucked the tag behind the flower. I added an extra leaf for a trio of leaves. I kept the color scheme monocromatic for the card theme. The embossed scalloped paper was the showcase piece of the card!
SUPPLIES AND MATERIALS
Altenew MIdsummerBouquet outline stamp set and sentiments
Craft-Class Altenew Anniversary 2022 Class Bundle
Altenew Morning Flowers Layering stamp set and sentiments
Altenew 6″ x6″ Scalloped Frame 3D embossing Folder
Altenew ink cubes- green, blues and purples
Altenew alcohol markers- green, blues and yellow
Altenew silver glitter washi tape
Black ink
My Favorite Things mini banner die cu, stitched edge rectangle die
Welcome to Altenew’s 8th Anniversary Celebration! Read on for all of the exciting Events, Give Aways and chances to win Prizes! Join in the fun and visit links from Altenew Designer’s and an awesome list of crafting Companies .
Enjoy FREE U.S. shipping with code HAPPY8TH or $8 OFF international shipping with code ANNIV22 at checkout. Offer valid from 04/04/2022 at 12:01 am EDT through 04/06/2022 at 11:59 pm EDT. Not valid on prior purchases. Cannot be combined with other promo codes. Shop here: https://altenew.com/collections/all-altenew-products (Sale up to 45% off HERE and NEW releases HERE)
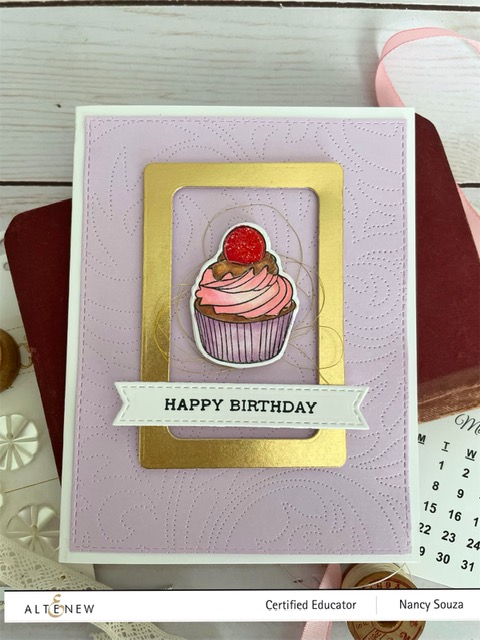
HAPPY BIRTHDAY/ANNIVERSARY CARD!
Altenew cupcake stamp and coordinating die
A happy congratulations and celebration card for the Altenew party event that I created for the special celebration. I stamped the cupcake image using AltenewAll Things Sweet Layering Stamps and coordinating Die set. This is a layering stamp set and I stamped each section using permanent black ink and colored, blended and shaded using Altenew alcohol ink markers. The sentiment tag was stamped using Altenew’sSentiment Strips 3 stamp set. The background was created using Altenew Dotted Swiss debossing plate and lavendar solid cardstock. I created the frame using two rounded rectangle dies from Altenew and gold foil card stock. For added dimension I layered two more die cut cupcakes from white card stock, and also for the word tag. Foam tape for dimension and gold thread bundle for visual interest.
Special Offer
Enjoy FREE U.S. shipping with code HAPPY8TH or $8 OFF international shipping with code ANNIV22 at checkout. Offer valid from 04/04/2022 at 12:01 am EDT through 04/06/2022 at 11:59 pm EDT. Not valid on prior purchases. Cannot be combined with other promo codes. Shop here: https://altenew.com/collections/all-altenew-products (Sale up to 45% off HERE and NEW releases HERE)
GIVE AWAY PRIZES
Over $2,000 in total prizes! Altenew is giving away a $80 Gift Certificate to 5 lucky winners and oneAltenew Academy Online Class($8.95 value) to 15 lucky winners. There are also 26 awesome companies/crafty friends who are celebrating with us, and they are offering the following prizes-
Be sure to leave comments by 4/15/2022 for a chance to win one of 50 prizes! To make the hop more exciting, start your comment with “Hi from (city or country where you’re from)!” 50 winners will be chosen at random from the comments left on any of the blogs listed below and will be announced on the Altenew Card Blog on 4/21/2022.
ALTENEW CERTIFIED EDUCATORS 2022 PANTONE COLOR INSTAGRAM HOP
MY PANTONE PURPLE ALTENEW CARDS
Hello and welcome to the 2022 Very Peri Pantone Color of the Year and Altenew cards that I created using the 2022 coloR. I used shades of lavendar and purple. I did not realize that I had created so many cards where I used this color. I created these cards for my work as a Guest Designer and for my assignments for my AECP certification. Here are the cards I included for the Altenew March Instagram Hop. Have fun and happy card making.
PRETTY PURPLE PAPERS- TECHNIQUES AND STAMPS
For all of these cards, I used a variety of Altenew stamps, sentiments, coordinating dies, stencils, inks, debossing cover plate, washi tape and layering stencils.
INSTAGRAM HOP DETAILS
Hi, friends! Altenew Certified Educators are joining a fun blog hop and the theme is “𝐏𝐚𝐧𝐭𝐨𝐧𝐞 𝐂𝐨𝐥𝐨𝐫 𝟐𝟎𝟐𝟐 𝐚𝐧𝐝 𝐌𝐨𝐫𝐞” showing off periwinkle + one or more color projects! The hop starts from @altenewllc so make sure you start from the beginning!
Altenew is giving away a $20 gift certificate to five lucky winners! For a chance to win, please follow @altenewllc and @espressoexpressions and leave a comment by 03/24/2022.
Altenew will draw five random winners from the comments left on each stop of this Instagram hop and announce the winners on Altenew’s Educator Instagram hop post on 03/25//2022.
Head over to your NEXT STOP- @irishrosecreations
check out Colleen’s awesome posts!
Here is the complete list of Altenew Educator’s Instagram links-
@bridgetcaseydesigns
@karens_mini
@espressoexpressions-YOU ARE HERE
@irishrosecreations
@lanabylanadesign
@handcraftedbyjoy
@cardsbyann
@auzztrinkletsncrafts
@channellingmarthaau
@yesvirginialu
@craftyannastudio
@sevenscrafts
@crown_focus
@paperaddictpam
@mylittleatticstudio
@sandespoema
@rotejas_magic
@annemarie_the_crafty_kiwi
@jaycee.gaspar
@pennypynnonen
@handmadebytasha13
@mes_cartes_a_moi
@terismailbox
@tenianelson
@kariavan
@altenew_planner_girl
@teresakim16
ALTENEW STAMPS AND COORDINATING SUPPLIES
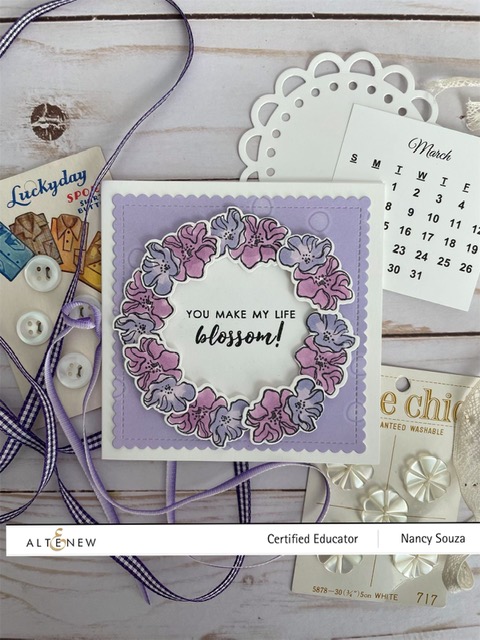
Build A Flower Candy Stripe Cosmos layering stamps and die set
Hello to the month of March! And March cards that I have created in months past is usually connected to St. Patrick’s Day. Believe it or not, I don’t have lots of stamps or card making supplies to use for St. Patrick’s Day celebration. So it was time to get creative with the supplies and paper that I have in my collection,
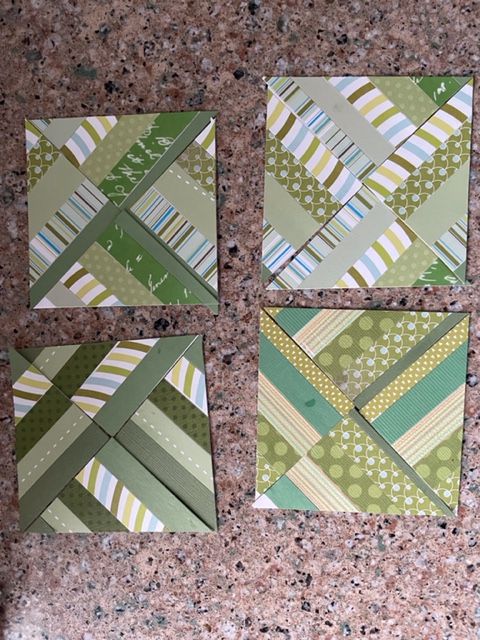
I was inspired by watching a great video by Jennifer Mcguire that was about using paper scraps to create a background and creatvie paper piecing. So I thought I would give it a try. I dove into my patterned/printed green scrapbook paper pieces that I had in my vast collection.
Next was to cut the paper into 1/2″ strips and glue to a white card base mixing up the printed paper. Once that was done, I cut the new background paper into 3 1/2″ square. Then I cut that piece corner to corner diagonally to create four right angle triangles. See photo for this step.
Cut into 4 triangles
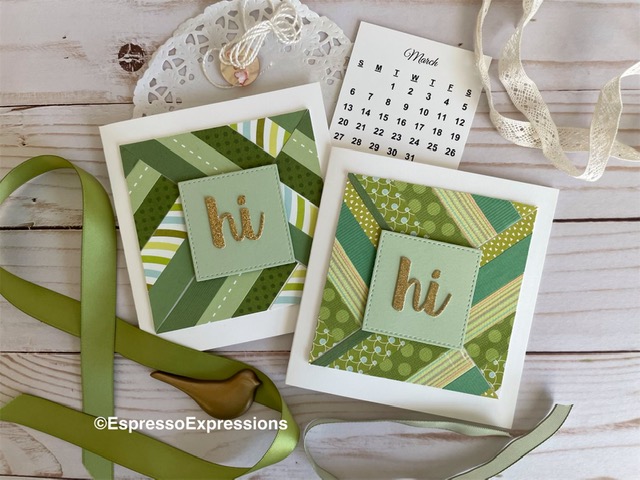
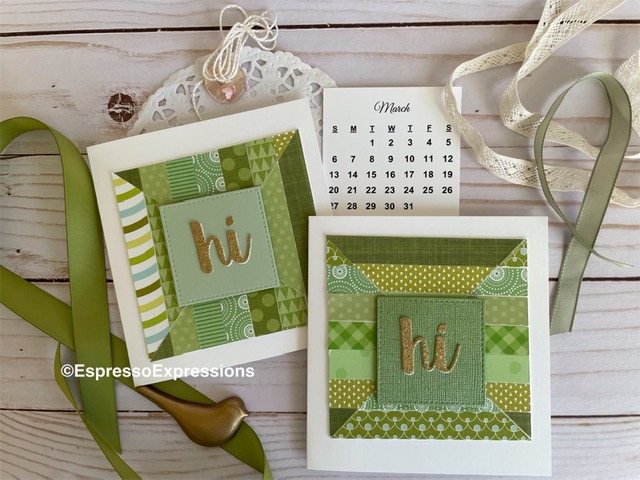
Then I created the mix and match patterns for each four square piece for the card front. I cut a piece of 3 1/2″ white card stock to adhere/glue the four triangles. I die a cut a small square to cover the middle where all of the pieces met and covered any issues. I also die cut a Hi using gold glitter paper for the middle of the green square. There are so many different ways to use the triangles to create different layouts.
The card base is a 4″ square using white card stock and fits in an A2 envelope. Lots of different paper strip patterns and combinations. I used lots of scraps of patterned paper that had I had in my collection. Hooray! Give this technique a try. Now I am trying solid paper to create different combinations and patterns. Have fun and happy card making.
SUPPLIES AND MATERIALS
white card stock for 4″ card and for background square
A2 envelope
patternred/printed paper scraps
My Favorite Things- hi die cut and stitched edge square die
HELLO AND WELCOME TO THE ISLANDS IN SPACE BLOG HOP
Altenew is featuring the new release of the Whimsical Flower Bunch coloring sheet set packet. This packet has 24 coloring pages of 6″ x6″ 80 lb printed on white card stock . There are twelve designs printed either with a black outline or gray outline. Lots of opportunities to create cards, framed pictures or other ideas you might have. Happy coloring!
WHIMSICAL FLOWER BUNCH COLORED CARDS
I created six A2 cards using six different coloring sheets using the black outline images. I used Altenew Artist Markers dual tip alcohol marker sets – Island Garden set and Space Garden set to color, shade and blend the whimisical flower images. There are twelve markers in each set. Each marker is numbered and has a brush marker tip and a a fine tip for coloring and shading. Here are the cards and printed pages from the packet.
Each card is different depending on the printed image. For a few I trimmed the image to use on the top, bottom or the sides and if I used the printed sentiment as the focal point of the the card. I used Altenew alcohol markers to color the die cut Altenew Hello to coordinate with the colored flowers. I also colored white card stock using the markers for the Altenew Thank You tag and for the Altenew Hello tag stamped with black ink and die cut or trimmed.
ALTENEW WHIMSICAL FLOWER BUNCH COLORING CARDS
CARD 1– HELLO
Alrenew Hello die cut and matching stamped word tag
CARD 2- THANK YOU
Altenew alcohol inked and stamped word tag
CARD 3- HELLO THINKING OF YOU
Altenew inked and stamped word tag
CARD 4- SENT WITH LOVE
CARD 5- NOTHING CAN DIM YOUR LIGHT
ALTENEW GIVEAWAY PRIZES
Altenew has $300.00 in total prizes. To celebrate this new release, Altenew is giving away a $50.00 gift certificate to two lucky winners and a $25.00 gift certificate to eight winners! Please leave a comment on the Altenew Card Blog and or each Designer’s Blog post on the Blog hop list below by 2/26/2022 for a chance to win.
Altenew witll draw ten random winners from the comments left on each stop of the Blog hop and announce winners on the Altenew Winners Page on 02/18/2022.
SUPPLIES AND RESOURCES
Altenew Whimsical Flower Bunch 6″ x6″ printed with a black or gray outline coloring sheets 24 sheets
Altenew Alcohol marker sets-Island Garden set of 12 and Space Garden set of 12
Island Garden has bright 4 shades of pinks and corals, 4 shades of blues and 4 shades of green
Space Garden has 4 muted shades of purples, 4 muted blues, and 4 muted shades of yellow
Altenew Craft Your Life Feathered Lilies Hello stamp
Altenew Craft Your Life Feathered Lilies Thank You stamp
Altenew Hello die and tiny sentiments stamp
Black ink for stamping
My Favorite Things stitched banner die, mini banner die, stitched rectangle edge die, rounded corner rectangle die